K is for Kryptonite


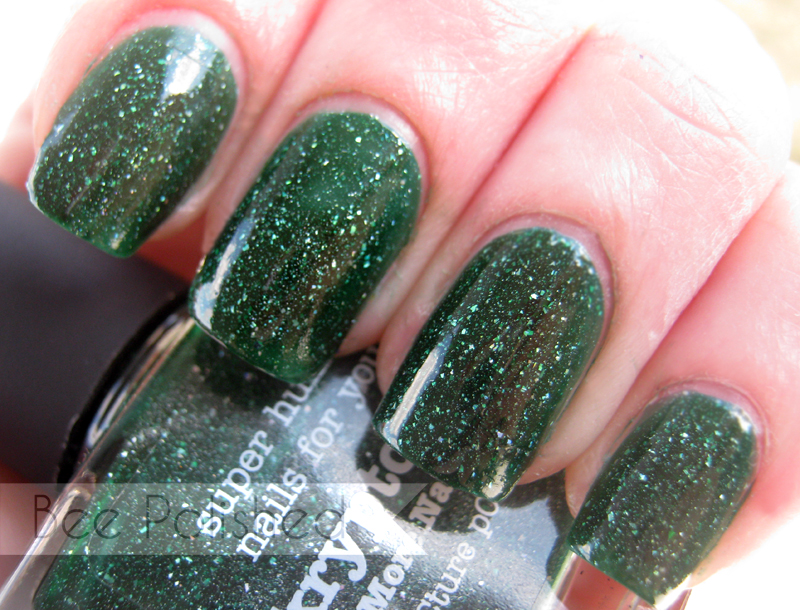
It's time for the letter "K"!  I'm really excited about this one because I haven't had a lot of excuses to wear this gem and I'm glad I finally got around to it!  This is Picture Polish Kryptonite.  This is the only Picture Polish I have and just based on this one, I need MORE!  The formula is fantastic; this is two coats of polish. It goes on smooth and the brush is mid-sized, not too fat or too skinny.  The only thing I don't love is the size of the bottle.  But it's worth it for this gorgeous color!  You can't see it very well in this picture but this has holographic flakes of glitter running through it as well. So pretty! :)

Don't forget to check out what Emma and Kerrie have for the letter "K".

The brightest stars in Gemini...


It's time for another Lime Crime glitter!! I've already showed you Scorpio, Aquarius, and Leo and today I have another gorgeous glitter to show you.  This one is called Gemini.  It's a translucent white iridescent glitter.  One thing I love about these is how easy they are to use.  The pot above is with the shaker top off but you can also use them with the shaker intact.  It has three little holes in the top for easy access and you can simply tap it onto your nail OR you can tap it into the lid and use it that way.  For today's nails I polished with a white base and then just shook the container lightly over my nails.


Here's the result!  I left these top coat free because it seems to be a new trend to have slightly textured nails.  Plus they have this amazing sparkly quality to them which was intensified by the matte base color.  I LOVE the way this one shifts with rainbow-y flashes in the light.  It's very angelic looking.  This actually stayed on really well too even without a top coat.  And even though it had a slightly textured look to it, it didn't feel super gritty or catch on anything. This one seems understated but it's really not! It's a real stunner.  Here's a close-up...


You can pick up Gemini or other Lime Crime Glitters at Lime Crime Makeup.

Colors Used:
Orly Au Champagne


This product was sent to me for my honest review. I have not been compensated for my opinion.

Crossing the line...


Today I have a simple design for you. Funny enough I had a dream about doing these nails, so when I woke up...I knew I had to recreate them. It's fate, right? I debated a bit on what to use for the blue color and I almost used OPI Dating a Royal but I like this a lot better. It's nice and clean and simple and made up of two of my favorite colors!!


Colors Used:
Essence Chuck and Romeo
Seche Vite

butter LONDON and GOOP


Today I have some swatches for you of the GOOP/butterLONDON trio which was released around Thanksgiving last year.  I hesitated to swatch these for awhile because I wanted to work out the issues I was having with GOOP first. I'm not going to go back into all that mess but I did want to update you on some recent occurrences with it. First, someone had suggested that I contact butter LONDON to let them know about the issues I had with GOOP.  I did end up doing that, mostly because I found it rather appalling the way GOOP was telling me every email that it was all butter LONDON's fault.  Even though I stressed to them that I knew they had no hand in the mess and just wanted to alert them to the bad customer service people were receiving with regard to the lacquers, they ended up apologizing and sending me a $15 off coupon.  At that point I had given up on GOOP and since it had been over a week since I last spoke with GOOP and had not received any kind of response from them (not even an automated, we got your email response) I accepted the coupon and moved on.  Then, two days later I received an overnighted package from butter LONDON.  Inside was a handwritten apology from butter LONDON and GOOP and a free box of lacquers. I strongly suspect that this is the doing of butter LONDON and not of GOOP at all, given how closely the two occurred.  BUT  I digress. They did make good on their promise to send me free lacquer for my trouble and they did apologize. I did find out also that there were numerous complaints regarding GOOP and the butter LONDON lacquer set. But that's how my experience went so there you go.  Now lets get on with the swatching!

First up we have Abso-bloody-lutely...

Abso-bloody-lutely is described as a cherry red gloss.  To me it leans darker than cherry red but it certainly is glossy! It reminds me A LOT of La Moss, another bL color I love. It IS brighter than La Moss and it's a bit more jelly like, although it is fully opaque in two coats.  This has no topcoat so you can see that it has a gorgeous finish. Even though La Moss is darker and bit more vampy, I don't think I needed both. This is a great fall color though.  


Moving on to Bread and Butter Pudding.  This one is sort of boring but honestly, I love it.  I really dig neutrals that give nails a glossy, healthy look and this fits the bill perfectly. This is three coats and it builds up nicely but it's definitely not meant to be a full coverage polish. This is perfect for the office or anywhere you want gorgeous nails but can't have a lot of color. I used it for New Years with some Orly Halo sponged from the base up and it was just fabulous.  It reminds me of the OPI Ballet jellies.


Bonus picture of the New Years nails! :) Last up we have Hampstead Heath...


This one is the real stunner in the group.  It's sort of a flakie/shimmer/glitter/glass fleck....I don't even know. It has large flecks of gold and green and a deep green base. It's just flawless and unlike any other polishes I have.  I had to take a macro of this one so you can see what I mean...


Look at all those colors!  This is also two coats and no top coat and you can see that it dries smooth and shiny just like the others.  They don't sell these separate but if they did this would be the one to pick up!  

Did you snag this collection? Which is your favorite?

DIY Lightless Gel Manicure


Well ladies and gentlemen...it's been a long week. We have arrived at the seventh day of my lightless gel mani trial.  I know you're going to be impressed because the picture above it my seventh day of wearing this manicure. SEVEN. DAYS. Seven!  Color me gobsmacked because I really thought this was going to be a fail.  You can see that I even managed to break off the corner of my index nail and still my polish is near perfect. There is some growth at the cuticle (duh) and a bit of wear at the tip of my index finger. Also some VERY minimal wear on the other fingers (I attribute the extra to the break). I got bored about three days in and threw some Lime Crime glitter in Leo on my ring finger too! :P

 I use my hands a lot at work and my manicures do not last. With Seche Vite they manage to go for about four days without chips but that's been the longest I've had so far.  If you don't type and use your hands all day long every day you'll probably be able to wear this even longer. To have something that doesn't require an expensive light, doesn't require new polishes and doesn't require any special training to do....that really lasts is just fabulous. Another really wonderful thing about this is that there is no special removal method. You can simply remove it as you would any regular polish.  It comes off easy as that.  So now I know you're asking, how do I do this?  Well let me show you!!

 A few things I want to note for you quickly:

*Though this is not gel polish, it's VERY important that when you're wearing polish without changing it for long periods of time to use a cuticle oil everyday or at least once every other day.  This not only helps the polish last but it protects the nail underneath from damage due to dryness. 

*If you choose to do this more than once every two weeks, DO NOT buff your nails each time. ONLY buff them once every other week.  

*Use of a bonding agent is optional. I tried this once with it and once without and I found that it did help somewhat in extending the wear time.

*Keep your coats of polish THIN. The first time I did this on my non dominant hand I was a little heavy. Three hours after polishing this happened...


Fail. So just keep them pretty thin so that they have ample time to dry. :)  Now let's get this thing going!!

You'll need: 
A buffer (go with a 225 or above)
A fast dry topcoat (I'm using Seche Vite)
A bottle of polish
Polish remover of your choice


Optional:
A bonding agent (I used OPI Bond Aid)
A clean up brush
Drying drops (I used Orly Flash Dry)
Cuticle Oil (I used CND Solar Oil)
Lotion (I used CND Almond Lotion

Make sure you allow yourself at least an hour the first time you do this procedure. Salons allow one hour and fifteen minutes for a gel manicure so that's not unreasonable. Once you have the technique down, you can get this done in thirty minutes or less. :)

How to apply the gel manicure:

Start by removing all old polish and making sure nails are clean and dry.  Then lightly buff the surface, just to remove the shine from the nail plate.  Wash your hands or swipe them one more time with polish remover or acetone to be sure there is no residue from the buffing.  Then apply the bonder if you're using it.  Apply one thin coat of the Gelous. Allow it two minutes to dry and then add another thin coat. Allow this three minutes to set. Then apply your first layer of polish. Allow it five minutes to dry and then apply another thin layer of the Gelous. Be sure to wrap the tips when polishing AND when applying the Gelous.  Allow the Gelous two minutes to semi-dry and then add one final layer of polish. Finish with your fast dry top coat and then if you wish, wait one minute and add the drying drops.  If you're skilled at this, you can do this entire routine start to finish in twenty minutes. I use the time in between coats while the polish is drying or the Gelous is setting to use my cleanup brush and clean the edges. If any polish dries on the skin it can cause this whole thing to lift off so it's important to get it all off before applying the top coat at the end.  Give your top coat about five to ten minutes to dry before applying your cuticle oil and lotion. Then you're all set and ready to go! 

 You can use this with ANY polish in your collection! I didn't even have to buy the Gelous so it turned out to be a totally FREE gel manicure for me. :) Win! Plus none of the scary side effects of LED/UV light (not that that stopped me before :P)  I'd love to hear the results some of you have if you try this at home! I'm very hard on my hands at work so if it lasts this long on me I can only imagine the results some of you will have! Happy polishing!


Original post for this at home gel manicure can be viewed at The Sweetest Thing.

J is for Julianne...


 It's time for another letter in the A,B,C Challenge.  Today's letter is "J" and I actually had to do a bit of decision making for this one. I don't have a TON of J polishes but I have enough and several....OK most of those...are untrieds.  I've actually swatched this one before but never really worn it for anything so I decided to use it today.  It's Julianne by Zoya.  Julianne is a gorgeous purple shimmer with fat flakes of color running through her.  She also has a bit of a gold tone in certain lights.  It was pretty hard to capture it on camera but you can see the shift quite nicely in the macro shot below.  I just really love this.  I can't believe I haven't done anything with it!  


Do you have Julianne? Did you love her?
Don't forget to check out what Emma and Kerrie have for the letter "J".

butter LONDON Fiver


I have another butter LONDON swatch for you today! This is also from their upcoming Spring line and it's called Fiver. Fiver is a mint green so you know I HAD to have it.  I have about twelve million mint greens and I can honestly say, this one is my favorite. It's not super green and not super blue.  It's also a nice light color but it's not pale or muted.  It reminds me of appliances from the 50's! I love that the colors in their new line have a sort of vintage appeal to them.  This one also looks great with Kerfuffle, the peach tone I swatched for you earlier.  It too was opaque in two coats and even though the formula is on the thin side these are really easy to work with. I had no streaking and no bald spots. It dried to a fabulously shiny finish as well. Perfection. :)  I love it when a color turns out to be exactly what you hoped it would!

Did you pick up any of the new butter LONDON's? Which is your favorite?

butter LONDON Kerfuffle


This is a simple swatch post for you of one of butter LONDON's upcoming Spring colors, Kerfuffle.  I REALLY love this color. It's a pastel peach but it's just peach enough that it's not pink and just pink enough that it's not orange.  I have issues with peaches when they're too orange and then the pinker ones make my hands look weird so this is a perfect combination.  This is two coats and it was a dream to work with, much like most of the other butter LONDON colors I have.  It dries shiny and it wasn't streaky or patchy like pastels can sometimes be.  I love pastels and this one is PERFECT for Spring. It has a very vintage vibe to it which I think is part of the idea behind their new line. It definitely does remind me of sweets and macaroons and earlier, simpler decades!!. :)

Are you excited for the butter LONDON Spring line? What are your must have colors?

These are my nails...Rejuvacote Edition


Alright, it's time for my second post on nail strengtheners.  I wish these didn't take so long to put together, but it really requires around four weeks to see the full results on most strengtheners.  You need to allow your nail enough time to make a significant growth in order to see how the treatment is affecting your nail.  That's one reason I really don't care for using treatments.  You're meant to use them for two weeks only, for safety reasons, but two weeks isn't long enough to maximize results. I digress.  My first treatment post was about OPI Nail Envy. You might remember from that post that it caused MAJOR peeling on my nails and really, it didn't help them much. I left my other hand polish free while I was using that treatment and my polish free hand came out the same strength and peel free. Plus the growth on that hand was double the OPI hand.  So I decided to try out Duri Rejuvacote since many of you rave about it.  The above is my starting point.  These are all sort of shoddy photos and I apologize for that but my camera wasn't always available during this trial and I wanted to be sure to have more updates!  Anyway you can see that they're sort of thin and not very long or strong. For the life of me I can't remember what had caused the thinning at that time since I haven't had any  enhancements on my nails in some time but I think it was just too much polishing and buffing.  I wore the Rejuvacote for the first week with no polish and reapplied a new coat everyday as per the instructions.  Here are my nails after the first week:


There's not a crazy amount of growth but that's normal.  You can't expect miracles in a week!  The really great thing to notice here is that the thinning nail should have grown out and made a weak free edge.  It didn't.  The growth is strong and my nails look tons healthier already.  I kept using the Rejuvacote for two more weeks, but this time I polished intermittently.  I used it as a base coat and  reapplied OVER polish every day as per the instructions, except in cases where I changed the polish. Then I just started over with the base coat. Here are my nails two weeks later:


NOW we're seeing progress. I broke my index but this was because of a previous injury which grew out. You can sort of see it if you look at the second picture and even a little on the first. It was a bend low on my nail and when it grew up the plate it turned into a deep peel. I also managed to break my pinky nail BUT it took A LOT. I actually shut it in a car door and normally this would probably cause it to just crack off cleanly. In this case, it bent backward and I had to TEAR it off with my teeth. I didn't have clippers with me and I couldn't get it to just tear off. Insane. I noticed minimal peeling but not nearly so bad as with the Nail Envy. I also noticed that my nails looked and felt much thicker but they weren't brittle like some strengtheners make them. I continued using this for one more week and this is where the story changes.  I wasn't able to get a picture of this guys but...this caused separation of my nail bed from the nail. :(  Now. Before I get you all terrified, let me explain.  At first when I saw my bed separate from my nail I freaked. the. flip. out. Legit. I was REALLY freaking. Of course I stopped using the strengthener and all polish/remover/etc to allow the bed to reattach and be assured this was not from another source. It was not. However, upon further investigation, I realized something.  It wasn't actually causing separation. The strengthener caused not only my NAILS to grow, but also my upper cuticle. This is the skin on the back of the nail that attatches the base of the free edge to the nail. It was growing up MUCH higher than usual. You can tell when this happens because A) you'll notice that your nails look MUCH shorter, even though the free edge is long. It makes your beds look longer. and B) you can gently separate this skin from the back of the nail plate without pain. It had already started separating itself and when I stopped using the Rejuvacote, all my other nails followed suit. Still...I don't like that. If it's making my skin grow extra...who knows what else it's doing? Moral? Rejuvacote DOES work. BUT...stick to three week intervals and then take a week or two off and start again!!

Have you used Rejuvacote? Did you love it? 


I is for Irish Coffee

Duri Irish Coffee


It's time for another ABC Challenge polish color! Today is the letter "I".  I feel so Sesame Street saying that!! Anyway, this is Duri Irish Coffee.  Duri is a fairly new brand to me.  It's not carried at any stores near me and until I started nail school I'd never even heard of it.  Apparently it's heavily marketed to professionals and almost every nail magazine I have a subscription to has ads on every other page for it.  Unfortunately, this means there aren't a ton of online swatches available for the brand which makes it hard to choose colors from the website to purchase.  I chose this one and another called Indulge My Whim on my first order. Then I asked some friends what they'd get and snagged all those too! I have to say I'm VERY impressed with these. I believe the retail on them is $5 and it's WELL worth it.  I had some issues with my order but overall they were easy to work with and aside from Indulge My Whim (which was nothing that I expected it to be) I was stunned at these.  This is two coats of Irish Coffee and it dries to the SHINIEST finish ever.  Some of them are opaque in one coat and all of them are just flawless when dry.  They also last well on my nails.  For this particular manicure I tried a new technique that's floating around the web. It's a lightless gel mani that you can do at home with your regular polishes. So far it's been pretty good but I'm going to wear it for a week and update you with the results. If you have the chance to try out Duri polishes I really encourage you to do it! Pick this one up for sure! 

Don't forget to check out what Emma and Kerrie have for the letter "i"!

Scratch It Wraps: Rococo Gold


I'm so excited to be able to show you these nail wraps today! A few weeks ago I did a review on Scratch It Nail Wraps for you. I used the Evil Eye pattern they had available at that time to do an accent nail with some Barry M polish.  Well this time I have strips in Rococo Gold to show you.  I really wanted to save these too and do just an accent nail but come on, they're TOO gorgeous for that. One thing I really love about these is that a lot of times with strips metallics can look extra shiny or extra flat.  These are neither. They're deliciously shimmery and look expertly like actual polish. They have a very rich appearance to them and that makes them seem less like stickers to me!  I'm digging this fun pattern too though I wish my nails were a bit longer because I've got a bit of a mustache situation going on at the tips of my middle and ring fingers! Still, I love these and they're SO super easy to use.  I mentioned before that they provide a little file for you to buff your nails with before you start but I didn't buff mine before applying. It can help them to adhere but I had no problems keeping mine on last time so I skipped it.  Here's a close-up of the shimmery gold background for you:


Gorgeous isn't it?  You can snag these for yourself at the Scratch website, but hurry because they go in collections which means this one could be gone VERY soon!  :)  I have a short tutorial pic for you guys so you can see how easy these are to apply. It's my first one so don't be too hard on it!! I'm working on getting better at these so that I can do more cool tutorials in the future!


Have a great week!!


These wraps were provided to me for review. I have not been compensated for my opinion.

Rehab Your Nails: How to fake a long nail bed


OK...the time has come. Today I'm going to show you how you can quickly fake the look of a longer nail bed.  This only really works with specific manicures and the best example is a french.  What you're looking at now is my bare nails.  Notice that the free edges are not all the same length.  This happens when the beds on some nails are longer than others and it's pretty common.  When my nails are polished, you don't notice the difference and they all appear uniform.  There are ways to change that too, at least to some extent but it's also why some people choose to file their nails with polish on.  I don't recommend that but filing is not the topic of the day so let's focus instead on how we can polish these in a way that makes them all uniform and also long and slim.  In this next picture, I have polished my nails with a series of different French tones. 


From left to right I have used: Sheer Nude, Bare Rose, Beverly Hills Plum and then a clear coat for the base polish. These are all by Orly (except the clear which is just Seche Vite).  I used Zoya Purity to do the tips.  There is nothing special going on here. I just did a standard French following my natural free edge.  To make them appear a bit more uniform, I've drawn the white line down a bit on some nails. If you have longer nail beds that's not going to be an issue for you but to create a larger free edge is suicide for shorter nails. You're only increasing the shortness of the bed.  So what can you do?  Here's a trick that pro's use...


Start by polishing your nails with an opaque but flesh toned polish.  I've used Zoya Avery here and it looks much closer to my skin tone in real life than in this picture. You may have to do some digging around to find a good tone to match your skin. I really recommend checking out the Zoya nude tones first because they have several really great ones that should fit anyone. (I picked up Kennedy first but she was too pink for me).  Once you have your base down, polish a regular French manicure on.  Just for thoroughness I have used the same combination of French tones OVER the nude color for this manicure. Again from left to right we have: Sheer Nude, Bare Rose, Beverly Hills Plum and then a clear coat.  You can see that it affects the color of the base just as it did my natural nail bed.  Now I want you to notice what I've done with the white line.  On my index and pinky nail, the bed is exactly the length it was above. I haven't extended the bed or the free edge, I simply polished along my natural line.  Now look at my ring finger.  Here I've extended the free edge (the white line) to make my nail appear longer but my bed appear shorter. This trick works well for longer beds because it can make your nails appear longer without stunting a short bed. You can see that because my beds are longer, it didn't make them particularly wide or short looking, rather it just gives the appearance of a longer free edge.  Now look at my middle finger. Here I've shortened the free edge dramatically. now my nail looks shorter, however, my nail bed looks longer. See how easy it is? Those with shorter nail beds can use this trick to lengthen them while those with longer nail beds can use it to lengthen the free edge in just a few minutes!  Try this trick with your own nails and experiment with different sizes of white and nude to see what works best for you! :)

*Note: this trick is intended to give the appearance of a slightly longer nail bed or free edge. It does not change the actual length of your nails and should not be used to drastically increase these proportions.

Rehab Your Nails: How to shape nails

This is a quick guide to shaping your nails in a way that will flatter your hands and make your nails look the best they possibly can. I've had a lot of people ask exactly HOW to file and I'm working on bringing you a "how to" series which will address polishing, filing, shaping and some other things that I get asked about frequently.  For now, I have this mini guide to making nails look their best.  This deals a bit with nail beds and the length of your particular bed, so I feel that it fits in well with this months New Year New Nails series.  The pictures in this post are NOT mine.  I love you all but growing and nubbinizing my nails was just too much work for me! This girl did an amazing job of taking the pain out of this simple tutorial for you.  So here we go!


This first picture shows you two different shaped nails.  On the left you'll see that the nail is very short and because of the width and length of the nail bed, it's creating a square shape.  On the right we see the same nail but grown past the length of the tip of the finger so that now we have a more rectangular shape.  What I want you to notice about this is the way that her FINGER looks in each picture.  It's the same finger. The same hand. The same nail  But notice in the picture on the right how much slimmer her finger looks.  Keeping the nail length and the nail width complimentary can do wonders for the appearance of your hand! 


Now we're seeing the same effect here but with rounded nails.  Notice again how on the left the circle shape is making her fingers look more stubby and on the right her hand looks more slim and feminine.  Again, all that's changing is the proportion of the nail.  If you have longer nail beds, you may be able to carry off these shapes without much or any free edge but if you have shorter nail beds you'll need to carry more length to keep them in proportion.


Here we have two basic shapes.  On the left we have the dreaded triangle shape.  Notice the way it makes the tops of her fingers seem wider and shorter?  On the right we have the more pleasing rectangle.  Again this is slimming and lengthening the finger. The triangle shape happens to some people naturally but if it can be avoided it generally should.  You can fix this quite easily by taking in your sidewalls a bit. (Please note: You should never attempt to remove the side portion of your nail to the point where it hurts or loses it's natural curve. This can be dangerous and causes a breakdown in structure).


Finally, we go to the square vs. round shape.  This is a point of contention a lot because classically people tend to go for more oval or rounded shapes. It's a very modern and trendy thing to go square.  You can certainly choose which you like but do notice that the square shape (on the left) makes the fingers appear more wide and blunts the tips of them whereas the rounded shape (on the right) will make them appear more slender and elongate them.  If you have wider nail beds, a rounded shape may be to your advantage unless you are able to carry a lot of length.  If you have slimmer nail beds, you may want to go for the squared shape in order to give the appearance of width.  I hope this lesson in nail balancing and shaping has been helpful to you! Try out some different shapes and lengths on your own hands and watch the difference it makes!


The pictures shown on this page do not belong to me. They are from a nail care post by Into-Mind and the original post can be viewed at Into-Mind.com

101 Reasons Why I hate GOOP...

OK, maybe not that many.  However, enough that you should be wary of them too.  In my pursuit of new and hopefully, cheaper, routes of getting nail polish I've tried a number of companies.  Some of them have been amazing (like Lime Crime) and some of them have been not so amazing (Duri, anyone?) but none has been so awful as GOOP.  Let me preface...

This past December, GOOP and my favorite polish brand, butter LONDON, paired up to release an exclusive GOOP three pack of polish. It consisted of Hampstead Heath, Bread & Butter Pudding and Abso-bloody-lutely.  Naturally, being the fan of butter LONDON that I am, I jumped at the chance to grab this limited edition three pack.  That, ladies and gentlemen...was a mistake.  Never mind the fact that the polishes are sort of bleh (more about that below) the real issue was getting them in the first place.  I placed my order with GOOP on the 16th of November. This was a Friday and being it was after 5PM I assumed that  nothing would probably happen with the order until Monday.  As I suspected, on Monday the 20th I received a notification that my order had shipped and would arrive within 3-5 days.  Hurrah! So far so good.  With it being a holiday week (Thanksgiving was the 22nd) I thought it might be a bit delayed, but I expected to have these in time to wear for the holiday season.  Imagine my surprise when on the 30th of November, a FULL ten days later I still hadn't received my package. So I contacted the company.  They sent me an email saying I had placed it on a holiday week (not true but I'll go with it) it would be delayed and would be there no later than Tuesday the 4th. OK, fine.  A little delayed but it was sort of near the holiday so I was frustrated but still in good spirits.  Tuesday went. Wednesday went. On the 7th I contacted them again. Sometime later that day I got another email, this time from a butter LONDON representative who said GOOP had contacted them to send me a tracking number for my order. The tracking showed that my package shipped...SHIPPED the 3rd of December. Curious. Now, don't get me wrong here, I understand that perhaps my items may have been lost or mis-shipped or mishandled. Fine. So you need to ship again. I can understand that. What I can't understand is why you would tell me my order will arrive the day AFTER you know it's just re-shipped (or possibly shipped for the first time).  Why not just say what happened? GOOP finally did get back to me.  They passed almost all the blame off to butter LONDON saying that they don't actually ship these items they only rely on the word of the companies they work with to ship them. Say what? You mean to tell me that your company sends shipping notifications based on the possibility that an item may have shipped within a specified time frame? Logical? No. True? Doubtful.  I've actually placed numerous orders with butter LONDON in the past and always gotten my orders without issue.  That was all bad enough to send me into a tizzy and then when I finally did receive my order almost a full month after I placed it I was pretty disappointed in the colors. Bread & Butter Pudding is lovely but just a sheer, neutral and Abso-bloody-lutely is an exact dupe for their lacquer La Moss. Hampstead Heath is the only must have in the set. That aside the email I received from GOOP also mentioned that because of the problems I'd experienced with their company, I'd be receiving a complimentary polish pack. I'm sure you'll all share my shock that it's now been over a month and no such polish pack has arrived. At this point I don't even want it. What I DO want is to warn you to please not use the GOOP site.  It's more hassle than it's worth!

The art of neoplasticism...

art


It's the final day of the Digit-al Dozen challenge! Today is me only recreation of an art piece for this challenge. It's a recreation of a painting by Piet Mondrian.  Mondrian was a Dutch painter and a very important person in the De Stijl art movement. The basis of his work, and of the movement, was to use only white, black and primary colors and to use grids to create patterns.  The movement went on from around 1917 to 1931.  I really love the idea that these artists had only five colors and straight lines to use and yet came up with endless pieces of unique art.  It goes to show you that you don't need a lot to create when you have an imagination. :)  I hope you all enjoyed the challenge!  Please check out the art my fellow dozeners came up with for today's challenge and stay tuned for the next installment in my New Year New Nails series!  It will be coming this weekend. :)

Zoya: Purity, Pippa
OPI Red
Color Club Chelsea Girl
Models Own Black Nail Art Pen

H is for Harlow


It's time for another A,B,C polish challenge day.  Today's letter was "H".  I don't have a lot of polish starting with this letter so today's choice was pretty easy for me!  I got this one fairly recently and for an incredible price thanks to an amazing fellow polish addict.  It's relatively hard to find now but it's SO worth it if you can!  This is Zoya Harlow. Harlow was released in 2009 alongside Savita and Verushka as part of the Matte Winter collection.  I have Verushka and it's a lovely emerald green matte. Savita is brighter purple.  Harlow is really easy to work with and while she's STUNNING matte...you HAVE to see her shiny to appreciate her in all her glory!


I don't really consider these to be matte's.  In the polish world there are a lot of terms and definitions and I think sometimes big brands don't do enough research!  These are really more of a suede than a matte since a suede by definition is a matte shimmer polish. Just look at all that shimmery goodness. Gorgeous. I thought this was sort of similar to China Glaze Misteltoe Me, a polish I picked up awhile back for next to nothing to try to kill my lemming for this one.  It's not. Not even close. It's much more of a lighter, brighter pink.  Still...I love them both!  Here's a close up....


See all those red and silver shimmery bits?  It's very complex and just lovely.  

Do you have Zoya Harlow? Do you love her as much as I do?

Animani-eyes


It's day four of the Digit-al Dozen art challenge and today's art is a little outside the box!  I had a lot of ideas of what to do for today and I landed on this one: anime.  I'm not SUPER into anime but I am into it and I love the big eyes they always have.  I tried to re-create one style of the big anime eyes today for my nail art.  I also included some little round cheeks on the remaining fingers but it's sort of hard to make out. :/  I did like the way these came out but they looked a little odd on my nails in person!  It's sort of weird to be watched by your fingers all day!  I hope you're enjoying the challenge! There is one day left so stay tuned and don't forget to check out what my fellow dozeners came up with for today!


Zoya: Avery, Purity
Models Own Black Nail Art Pen
HITS PowerFul
Barry M Peach Melba


Did you know...


Photo credit to Perfection Is Possible.


You can create illusions with your nails just by using some simple polish and shaping* tricks?  Make your fingers appear slimmer by going with almond shaped, rather than round or square nails.  Balance a shorter or wide nail with a squoval shape.  You can even fake a long nail bed with a neutral or opaque pale pink and a nice, natural french.  Check out next weeks New Year New Nails post to see how this simple trick can change your nails from petite to perfect in three easy steps!! And remember the rule of balance: keep your free edge to no longer than the full length of your nail bed for the strongest and most appealing look!


*Remember that shaping and filing should always be done with a grit of higher than 180. For best results, use a 600 grit and light pressure. If you have to "bevel the tips" or run the file along the free edge to remove layers of nail, your grit is too low for your nails. Most nails will be best groomed by a 600 grit.


American Graffiti


Here we go with day three of the Digit-al Dozen art challenge. Today's mani is inspired by graffiti.  I actually quite like graffiti.  I know it's basically vandalism but I think it's really interesting to see the different styles and types.  Street art is usually inspired by a very different muse than classic art.  That said I'm not super great AT graffiti.  My husband used to draw fat graffiti letters which were really cool but I failed at recreating them.  So this is a sort of lame attempt but I liked the results anyway!  I used a suede base to emulate concrete and then used a series of neons and some black and white polish to create the letters.  I used a matte top coat over the whole of it since I felt it looked more graffiti-like!  Don't forget to check on the other girls art work for today's challenge!


Nail art done using: 
OPI: Suzi Ski's in the Pyrenees Suede
Zoya: Purity 
Models Own: Black Nail Art Pen 
China Glaze: Hang Ten-toes, I'm With the Lifeguard, and Sun-kissed

Popular Posts

Like us on Facebook

Flickr Images