Sparkles and stripes...


This is another remnant of my vault cleanout!  I think ultimately after I had this one on my computer I just didn't think it was clean enough or that it photographed well enough to make it on the blog.  That being said I really loved this mani too and I wore it for a considerable period of time. I started out with just wanting to do the stripes and then I decided later to jazz it up a bit with some glitter. I hope you enjoy it!! :)

Swatch This! Butter London Fiddlesticks


Here's a little swatch post for you! Haven't done one of these in a bit so I thought I might start again. Originally the intention was to swatch my entire collection and weed out dupes and colors I don't wear or won't wear.  I'm not sure that's really a viable option at this point -- especially as I'm in the midst of a move -- but it's still a great way to see the pretty colors I have. :P  So this one is Butter London Fiddlesticks.  I believe it was a holiday release but for the life of me I can't remember the name of the collection.  It came out in 2012 along with a plethora of other glittery shades.  This is a perfect shade for fall and for the upcoming holidays so it's definitely a keeper!! What do you think? Do you have Fiddlesticks?

Funky Fingers Anna


Last but not least on the Funky Fingers Frozen polishes line up we have Anna!  I expected to like Anna the least of the three (just not huge on multi glitters) but I actually really liked her!  She has the same white hexes and snowflakes as Elsa and Olaf BUT she also has purple and blue hexes and blue snowflakes.  The blue snowflakes were a total surprise to me. One just happened to land on my index finger and I then of course I had to look for more!


I've swatched her here over Butter London Sozzled.  I think the combination is pretty spectacular!  Really in love with all three of these.  If you can snag them I highly recommend it! Which is your favorite? Elsa, Anna or Olaf?

Lucy in the sky


It finally feels like Spring outside!! Hopefully this time it sticks.  I thought for the warm weather I'd break out the Spring colors.  Also I just picked up this incredible glitter the other day called Lucy in the Sky.  It reminds me a bit of Tart with A Heart but they're not near similar enough that you don't need both! I also successfully completed this tape mani without pulling my hair out!  Although I did have to start over once. I really need to get in the habit of putting down a base, waiting a day and then doing the tape ones. I have ZERO patience for dry time and even with a quick dry top coat it just never works out for me! Hope you all enjoy this fun, Spring look!

Girly Glitter


Today's small nails look comes to you from Fashion Week again! These nails were sported on the runway shows of Betsey Johnson this year. I really love her but I feel like these were a little tame for her show! At any rate I love how sparkly they are! I think these would be really great in varying colors for the upcoming holiday season. One awesome thing about glitter is it's sort of chip proof! When properly applied it really lasts forever and the even better thing about this is that you can do a really great color underneath and then when it's wearing out a bit just pop the glitter on top and leave it another week! This is the last of the small nails art for the month! There will be a four week update tomorrow and then at the end of the month don't miss the conclusion of my results with butter LONDON Horse Power!! Which look was your favorite?

Drawkcab Hcnerf....


For today's post I have another recreation of a New York Fashion Week look. This is a simple reverse french. Nude on the top, white at the base. I love this look for a few reasons.  One: It's really edgy and fun.  Two: It's stupid easy. And three: it really works to your advantage if you have smaller nails, ESPECIALLY if they're rounded. Because the focus is at the base of the nail, this draws the eyes away from the short tip. Also, because the rest of the nail is kept nude and the rounded shape and embellished lunula make the nail appear to be more narrow and long.  It's really a win/win!  It reminds me of a look I did last year around the holidays with glitter sponged at the base of a nude nail.


The second look is a bit more subtle and a little more girly but the idea is the same. It really creates the illusion of a longer nail. 

How do you like this look? Do you prefer the half moon or the glitter?

The Digital Dozen Does...Bling!


It's time for another Digital Dozen challenge week!! This weeks challenge is Bling! These nails were actually something I did to be festive for a recent trip to the zoo, but they're also very bling! Leopard is still hands down my favorite go-to pattern for nails in a hurry because it's SO easy to do and it always looks great.  Don't forget to check out what the other ladies came up with for today!!

Colors Used:
China Glaze I'm not Lion and Mahogany Magic
LA Nail Art Pen in Black


Bad Ass Polish Copper Waters


Today I have another swatch of Bad Ass Polish for you. This is the second of the new collection that I have for you! The first was Chocolate Covered Cherry.  This one is called Copper Waters. I want to remind you again that one of the great things about these polishes is the way they are packaged.  They come wrapped in felt inside of a super sturdy cardboard tube,


and then when you open the tube, you get a little thank you along with some directions on how to use the felt if you'd like for removal of the glitter polishes.  It's actually quite handy although it's not my glitter removal method of choice.


These tubes are wicked sturdy and they do an amazing job of protecting the polishes during transit to you or if you have to move them or if you're just clumsy like me and tend to drop things!! You can see how incredibly durable they are by watching this video of the creator, Amy, throwing the polish filled tubes into the air and letting them fall onto concrete!  Packaging aside these polishes are just gorgeous and complex.  The swatch above is three coats of Copper Waters with no base color.  It's a predominately blue and gold glitter mix, but like the other Bad Ass polishes, it has a whole host of other gorgeous colors that pop when it hits the light.  I also love that these can be layered up for full coverage or they can be easily thrown over the top of another polish, so they're very versatile.  They dry pretty smoothly as well and don't seem to eat top coat as badly as many other glitters I've had. I really can't wait to try layering this one over some other colors!!

 If you'd like to check out Chocolate Covered Cherry, Copper Waters,  or any of Amy's other amazing polishes, you can visit the Bad Ass Polish's Facebook page! You can purchase Bad Ass Polish at her Etsy store.  


These polishes were sent to me for my honest review. I have not been compensated in any way for my opinion.

Bad Ass Polish Chocolate Covered Cherry


Today I have another swatch of some Bad Ass Polish for you. You might remember that awhile back I reviewed a few of these, most from the "Are You Ready for Some Football Collection".  I have two more to show you this week and I could not be more excited about them!  The first one is called Chocolate Covered Cherry.  I want to remind you again that one of the great things about these polishes is the way they are packaged.  They come wrapped in felt inside of a super sturdy cardboard tube,


and then when you open the tube, you get a little thank you along with some directions on how to use the felt if you'd like for removal of the glitter polishes.  It's actually quite handy although it's not my glitter removal method of choice.


These tubes are wicked sturdy and they do an amazing job of protecting the polishes during transit to you or if you have to move them or if you're just clumsy like me and tend to drop things!! You can see how incredibly durable they are by watching this video of the creator, Amy, throwing the polish filled tubes into the air and letting them fall onto concrete!  Packaging aside these polishes are just gorgeous and complex.  The swatch above is three coats of Chocolate Covered Cherry.  It's sort of a warm brown polish with red and gold flecks throughout it.  When the sun or light hits it there is a really cool mulit colored glint to it.  I also love that these can be layered up for full coverage or they can be easily thrown over the top of another polish, so they're very versatile.  Here's a macro of the pretty sparkle!!


Just look at all those colors!!  Gorgeous, no?  I have one more of these to show you later in the week! If you'd like to check out Chocolate Covered Cherry, or any of Amy's other amazing polishes, you can visit the Bad Ass Polish's Facebook page! You can purchase Bad Ass Polish at her Etsy store.  


These polishes were sent to me for my honest review. I have not been compensated in any way for my opinion.

T is for Today Was A Fairytale...


Since I'm a little behind on the ABC Challenge (bad me) I've got a pretty combination to show you today!  Recently I started doing events for two major nail polish brands and one of them was Deborah Lippmann.  For my very first event I decided to do this glitter gradient.  What I really love about nude gradients like this is that they basically make your nails look like they're just growing glitter!  I also love that glitter is difficult to remove and so it protects the tips if I want to leave polish on for awhile.  It's a trick I use all the time to salvage mani's with a bit of tip wear.  I also really loved the unintentional smoky effect I got from using this particular combo.  The base in Today Was A Fairytale is a little bit tinted so it created just the slightest tinge of blue-grey.  The base color is Before He Cheats. :) 


Don't forget to check out what Emma and Kerrie had for the letter "T"!

R is for Razzle Dazzle...


It's time for another letter in the A,B,C Challenge!! Toady the letter is "R".  I had a lot of choices for today but I ultimately decided to go with this GORGEOUS Deborah Lippmann called Razzle Dazzle.  This was a Christmas gift from my husband and I haven't really gotten around to wearing it yet.  It's a stunning magenta jelly with glitters.  It looks really mulch-dimensional on the nails and it's super duper sparkly! This is two coats and it's completely opaque but it still has a squishy quality about it which I love! What do you think?

Don't forget to check out what Emma and Kerrie had for the letter "R"!

You can't have it both ways...


...or can you?  So it's no secret that the hot new trend in the polish world is texture.  With flocked, sandy, caviar and leather effect nails popping up everywhere, it's difficult not to notice.  While I love trends like crackle and spotted and now texture, I also hate that they're just that; trends.  We all end up buying tons and tons of these and let's face it: those 15 bottles of crackle polish you bought last year are just sitting in a drawer now getting zero use. Who wants last years trend on this years nails? I've tried to find new and exciting ways to use these effects polishes but this go round I thought it might be more prudent to find ways to get in on the trend without shelling out a lot of cash.  So here's a little experiment I did for you. :)  Above you see a combination of both Models Own Coral Reef and Zoya Godiva.  I chose Godiva for this experiment because she is a neutral color and therefore seemed the least likely to interfere with the color of the Coral Reef.  On the index, middle, and pinky finger I used two coats of the Coral Reef followed by one coat of Godiva on all nails but the middle, and two coats of Godiva on the middle finger.  As you can see, there is no texture.  On top of a flat polish Godiva simply looks like a gold glitter.  A pretty one, but a flat one.  So then I decided to turn the tables. On my ring finger we have two coats of Godiva (allowed to fully dry) and then a single coat of Coral Reef.  Bingo. Now we have a flat color with a textured look. This is similar to the look of the Milani's, Barry M's, and Nails Inc textures which have no glitter, but rather, a flat tone effect.  Here's a close-up comparison:


Again on the left here we have two coats of Coral Reef topped with two coats of Godiva. I'm guessing this is why they tell you not to use a base coat because it just looks like glitter on my polish. It was not raised in any way.  On the right we have two coats of Godiva followed by one coat of Coral Reef.  See how it's textured but the color is there?  Now you can turn any polish into a textured polish without ruining your bottle by mixing it or shelling out for a million different colors of polish! Magic!  If any of you try this with different colors, I'd love to see the results!!

O is for One Kiwi A Day...


For today's ABC Challenge I have a gorgeous Essence polish to show you! It's called One Kiwi A Day and it's from the Fruity collection.  It's basically a shimmery pastel green polish with little greenish blue glitters in it.  I like that when it builds up the glitters get sort of muted and the shimmer starts to flash more.  This is three coats and it builds to a nice opacity even though it starts out pretty sheer. I used the Essence Fruity top coat over this cause it smells like fruit!! :)  It does dry pretty shiny though even without top coat!
Do you have this polish?

Don't forget to check out what Emma and Kerrie had for the letter "O"!!!

Zoya Godiva


It's time for another Zoya Pixie swatch!! This is my favorite of the bunch, silly as it sounds! It really matched my skin tone and it just made my nails look like they had millions of diamonds on them.  It's like Britney Spears ala Toxic on your fingers!  It's really sheer just like the others but because it's a nude I stopped at two coats on this one. There is visable nail line but I think it kind of added to the effect. I'm SO super tempted to do a French mani with this one!  Maybe I still will!


Here's a close up of the gorgeous sparkle!!

Zoya Vespa


Today I have another Zoya Pixie to show you! This one is one of my favorites of the collection.  It's called Vespa and it's a lovely soft green color with silver shimmer.  It's hard to show the sparkle of these but they're very glittery in person.  Here's how Vespa looks with topcoat.


Super pretty, right?  I like that these can be worn both ways.  It's a little sheer like the other Zoya Pixie colors.  This is three thick coats of Vespa and it's especially noticeable in this picture that it's a little sheer. 


Isn't she pretty? *Swoon*

OPI Can't Let Go

This is the final polish in the Mariah Carey for OPI collection which is a liquid sand.  I think this one was my favorite, or maybe a close tie with Get Your Number.  This one is less complex than the others.  It's just a purple jelly base with purple glitter, but I think the lack of complexity actually works with this because of the texture.  This one is also sort of the 'safest' of the bunch if you want to try out the textures but not draw a ton of attention to your nails! It's a bit more subtle than it's cousins!  I used two coats again, it's a little sheer still in the picture but in person it was very opaque. Here's a close up of Can't Let Go:


Pretty, no?  Did you get any of the liquid sand polishes? Which is your favorite?

OPI Stay The Night

It's time for another OPI Mariah Carey swatch!  This one is called Stay The Night.  It's another liquid sand polish.  This one sort of reminds me of lava.  It has a black jelly base and then red glitter throughout.  This is two coats and no top coat or base coat.  I know they suggest using a base but I didn't use one for any of the liquid sands and had no issues with them.  Here's a close up shot of Stay The Night:


I could have probably used one more coat on this one, you can see it's still a little transparent on this close shot.  In reality though, it wasn't noticeable at all.  

Did you pick up Stay The Night?

OPI The Impossible


Today I have one of the new OPI Mariah Carey polishes for you.  This is one of the liquid sand polishes, which is a new textured polish.  I know I'm a little late on swatching these, you can find them all over the internet.  I had promised myself I'd get these OR the Zoya Pixies and since the Pixie's were a little cheaper for me I went with those.  Then my husband found these for a steal and since I've always loved Mariah....well...here they are anyway!  This one is a red jelly with larger glitter pieces and then some stars.  A word of advice, the stars sink to the bottom of the bottle so if you want them on your nails, you'll want to sit the bottle upside down for a few minutes before polishing.  Shaking seemed to be less effective for  me but I went ahead and swatched without the stars.  These actually go on very easily and dry pretty quickly.  They say to use base coat but no top coat but I skipped both.  You can tell when it's dry because it has a really matte textured appearance, even though it's still sparkly.  I waited a little longer between coats than I'd normally do with polish because I wanted to make sure it would dry all the way fairly quickly but it still dried much faster than I expected.  It wasn't difficult to remove either, like some glitters can be.  I had no staining with these, no damage to my nail from removal, and they're not exceptionally rough.  It's sort of the same way a fine grit file feels.  Here's a close-up of this one for you:


What do you think? Love it or hate it?

K is for Kryptonite


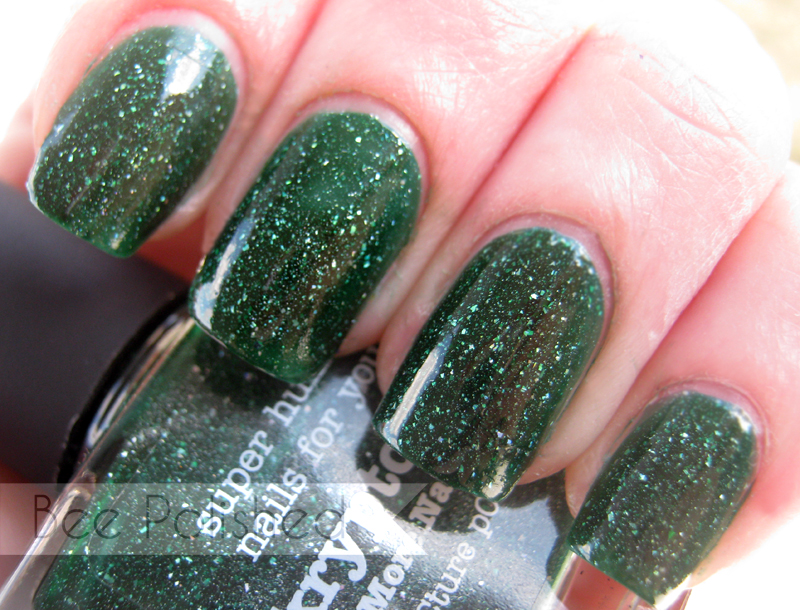
It's time for the letter "K"!  I'm really excited about this one because I haven't had a lot of excuses to wear this gem and I'm glad I finally got around to it!  This is Picture Polish Kryptonite.  This is the only Picture Polish I have and just based on this one, I need MORE!  The formula is fantastic; this is two coats of polish. It goes on smooth and the brush is mid-sized, not too fat or too skinny.  The only thing I don't love is the size of the bottle.  But it's worth it for this gorgeous color!  You can't see it very well in this picture but this has holographic flakes of glitter running through it as well. So pretty! :)

Don't forget to check out what Emma and Kerrie have for the letter "K".

The brightest stars in Gemini...


It's time for another Lime Crime glitter!! I've already showed you Scorpio, Aquarius, and Leo and today I have another gorgeous glitter to show you.  This one is called Gemini.  It's a translucent white iridescent glitter.  One thing I love about these is how easy they are to use.  The pot above is with the shaker top off but you can also use them with the shaker intact.  It has three little holes in the top for easy access and you can simply tap it onto your nail OR you can tap it into the lid and use it that way.  For today's nails I polished with a white base and then just shook the container lightly over my nails.


Here's the result!  I left these top coat free because it seems to be a new trend to have slightly textured nails.  Plus they have this amazing sparkly quality to them which was intensified by the matte base color.  I LOVE the way this one shifts with rainbow-y flashes in the light.  It's very angelic looking.  This actually stayed on really well too even without a top coat.  And even though it had a slightly textured look to it, it didn't feel super gritty or catch on anything. This one seems understated but it's really not! It's a real stunner.  Here's a close-up...


You can pick up Gemini or other Lime Crime Glitters at Lime Crime Makeup.

Colors Used:
Orly Au Champagne


This product was sent to me for my honest review. I have not been compensated for my opinion.

Popular Posts

Like us on Facebook

Flickr Images