Be Mine


Here's another quick Valentine's Day manicure I did.  I know it's a little late but...I still love it!! This idea was actually my husbands and I have all these pastels so it seemed like a good time to use them! The execution is stupidly easy.  I skittled my nails with different shades of pastel and then used various shades of marker to write cute little Valentine sayings on them. Did you know that the conversation hearts now say things like "text me", "LOL" and ";)"? I guess everything has to evolve!! I didn't top coat these after I added the marker. I've heard some people don't have issues with top coat and Sharpies but I didn't want to risk it so I top coated, then let them dry, then added the marker!  I hope you enjoy them!!


Colors used:
butter LONDON Kerfuffle, Fiver and Teddy Girl
Zoya Blu
Seche Vite
Bic Mark It! Markers

Rose colored lenses


Well..this mani was  both a fail and kind of a win at the same time.  I wanted to try out the splatter technique that everyone is doing but I tried a lot of different ways and it just wasn't giving me the effect that I wanted so I decided to go about it a little differently.  First I polished my nails white and top coated.  Then I thinned some polish until it was very liquid and dipped a large paint brush into it.  After it was nice and loaded I held it over my nails and just lightly tapped the base of the paint brush to cause little splatter drops to fall onto my nails.  I layered them and then added a little more white (using the same technique) to create these rosy marbles on my nails.  Honestly, I kind of love it even though it wasn't the intended outcome.  From a distance some of them look like hearts and roses and the whole thing has a very marbled, luxe feel to it.  I considered adding glitter or some kind of sparkly enhancement but decided ultimately to leave it as is.  


It's so soft and pretty! :)  Don't forget to check out what the other girls of the Digit-al Dozen came up with for today's Love and Heartbreak challenge!

Colors Used: 
OPI Sparrow Me the Drama
butterLONDON Knees Up
Zoya Purity
Seche Vite

One of these things is not like the other...


This is a combination nail art and comparison post.  It's probably difficult to see the comparison part right now but I feel like when I point it out it will be very obvious.  Anyway sometime back I got a pretty epic Zoya haul.  I'll be honest and say I had never really been very into Zoya  prior to April of this year.  For starters there were no retailers for it around me and I don't prefer to purchase my polishes online since it's really difficult to see what you're getting.  And then I did pick up a few when my Ulta started carrying them but they were kind of meh shades and they seemed to dislike my Seche Vite and chip more than other polishes on me.  Several people suggested I get a different top coat to use over them and recommended that I invest in Zoya's own brand of top coat since it works best with their polish but let's face it.  I'm not a salon.  I'm not interested in branding and with nearly 1,000 polishes I need a top coat that works with anything so I'm not investing in brands for brands.  So what changed my mind?  Discounts.  I ended up with quite a lot of them for pretty cheap and I thought since I wasn't wearing my polish very long it probably wouldn't matter so much if they chipped a day later since I'd be changing up the art anyway.  I also got a lot of wrapping practice working in a salon so I started to do a much better job polishing and wrapping my tips and the Zoya/Seche combination actually ended up working quite fabulously in the end.  So anyway, back to my story....I snagged a BUNCH of these things...


Yep. Yep.  This one was in the bunch. It's Skylar and she is a beauty.  Really reminds me a bit of butterLONDON's Victoriana which remains one of my most favorite polishes of all time for it's wonderful ability to be fabulous both shiny and matte.  Skylar is no exception.  After I had it on for a day I decided to dress it up and since I had just gotten a Klout perk in the mail, what better to use than my brand new Essie Penny Talk?  Then I added Seche but I didn't love the shiny look so I covered that with Essie Matte About You.  And now is where the comparison comes in.  I know you probably didn't really notice it and since we mostly do our nails all at once I may never have.  While I was making that infamous matte/shiny decision I matted one nail, intending to cover it with Seche if I disliked it and Seche'd another nail to cover with the matte.  Well ladies and gentlemen...check out my ring finger in this pic vs my other fingers.  Here's a close up if you need more evidence...


Yep.  If you haven't picked out the difference yet look for the shine on the middle finger.  On the fingers I added Seche to before I added the Essie there is just a hint more shine than on the ones I straight matted.  They're still all nicely matte but the metallic still has some sheen to it on the Seche ones.  Interesting, no?  I've only done that once so I'd love to hear it if any of you have had similar experiences!!! Thanks for following!!


31 Days of Christmas: Snow Globe


It's day three of the 31 Days of Christmas Challenge  and that means today's challenge is: Snow Globes.  I really wanted to use my new China Glaze green which I snagged in a set for $4 with a pretty glitter and, guess what? A snowglobe!  So I decided to do the snowglobe on just one finger as a fun accent.  I thought the snowman was kind of cute but looking at him in the picture he seems a little wonky too me.  Oh well, he only lasted a day poor little guy!! I used to love snowglobes when I was little and we used to make them with jars and fun things from around the house!  I hope you enjoy my snowglobe nails :)

Thanks so much for following along! Have you ever made a snow globe?
Don't forget to check out what Debbie, Claire, Kerrie, and Emma came up with for their snowglobe mani's!

Base on all nails but accent is:  China Glaze Holly-Day
Base on accent nail is: Essie Like Linen with China Glaze Holly-Day tips.
Snowman made with: Ulta Snow White, Hard Candy The End, Orly Orange Punch, China Glaze Poinsettia, China Glaze Holly-Day and China Glaze Snow Globe.

Purple Crumpet Fairy Challenge: Jelly Sandwich


It's Friday!! So you know what that means! Time for another Purple Crumpet Fairy Challenge! This weeks challenge was chosen by Emma, and it will be the last Friday challenge until January since we're working our way through the 31 Days of Christmas Challenge! :)  

The theme for this week was: Jelly Sandwich

I was really excited for this one because jellies are one of my favorite finishes.  I had a ton to choose from but I decided to use a new one that my husband picked up for me recently.  It was a bit sheer on it's own, as jellies tend to be, so I layered it over another jelly with a bit more finish before I made the sandwich.  I think it came out pretty nice!! I actually have a few of the Deborah Lippmann's which are intended to create this jelly sandwich like effect (think Glitter In The Air, Across The Universe...etc.) and I think this came out as great if not better than the Lippmann's.  I love the way the glitter looks suspended between the layers and also the way it's sort of muted but still glittery. :)  

Enjoy and thanks for following! Have you ever made a jelly sandwich?

Don't forget to check out what Debbie, Claire, Kerrie, and Emma came up with for their jelly sandwich mani's!
Base is: Essie Like Linen
Jelly sandwich made with: Essie Main Squeeze and NYC Starry Silver

New technique: Needle Marbling!


This is my very first attempt at needle marbling.  I think it came out pretty well.  The purple is the needle marble and then to make it a little more festive (and to cover a few mistakes...shhh) I added some silver lines with a striping brush.  I actually really liked this mani and it lasted a few days which is a record for my nails, but it was a bit time consuming since it was my first try.  I'll definitely be trying this technique again in the future though!! Today is my last day of regular nails before I attempt the Purple Crumpet Fairy's 31 Days of Christmas challenge.  This time of year is HELLA hectic for me so I make no promises! But I'll try to do as many as I can. :)

Enjoy and thanks for following! Have you ever tried needle marbling?

Base is: butterLONDON Muggins
Marble is: Barry M Indigo
Stripes are: Orly Sea Gurl

Stripe attack!


Lately I've been SO sick and SO tired. I literally went to bed at 7PM twice this past week.  I've been busy during the day and a week long migraine only added to my misery.  Last night I finally started to feel better and after I packed up a few swap packages I took off my polish.  I intended to re-do it this morning so I sat down with a nail wheel last night and played around with some designs.  This was one of them.  It took me some time this morning to get the motivation to actually do the art and then after I finished I realized I forgot the shimmer polish and had to start over. Hate that.  But I think my technique improved the second time around!  This actually looks much more intricate than it really is.  It took me no time at all to do from start to finish but everyone who has seen it thinks it's professional and has mentioned there's NO way I did it myself.  I'm even more proud of the fact that it's done entirely free hand.  Even the leopard print which I normally would use my trusty Konad stamp for, is free handed on this one.  I may do a tutorial for it in the future if I get enough interest because it really is SUPER easy and it looks really cool on your nails!!

Enjoy and thanks for following!! I'm off to set up my Christmas tree! :)

Base is: Models Own BlooBloo with one coat of Piggy Polish in I and Love and Blue
Leopard is done with: Models Own Concrete, China Glaze Ingrid, and Models Own nail art pen in Black
Stripes are done with LA Nails striper in White and dots are China Glaze Blonde Bombshell

The Purple Crumpet Fairy Challenge: Week Two


This weeks Purple Crumpet Fairy Challenge was chosen by Kerrie. The challenge was to do a mani using your birthstone as the inspiration.  My birthstone is the amythyst.  The Greeks believed amethyst gems could prevent intoxication, and medieval European soldiers wore amethyst amulets as protection in battle. Amethysts are believed to heal people and keep them cool-headed.  This was a bit challenging for me because as it turns out, while I have MANY purple polishes in my collection, not many had the pinkish purplely glow about them that I felt an amethyst should have.  So I did some hunting on the web.  I was starting to think I'd never figure out a great amethyst mani when I came across this picture:


I've seen a lot of amethyst in my life, but never one like this.  I love the way that the soft pink play s against the white and the deep purple.  So I rounded up my polishes and set out to replicate it.  This is what I came up with:


I originally intended to do a flat base and then use chevron mani guides to cover the tips while I painted over them with the deep purple.  That plan was quickly scrapped when I found out I had no guides.  So instead I loosely sponged on the purple and then did a glitter gradient from the bottom upwards.  You can't really see it in the picture, but the purple color also had a sublte shimmer about it which made this mani incredibly sparkly and really interesting to look at!  Enjoy and thanks for following! 

Don't forget to check out what Debbie, Claire, Kerrie, and Emma came up with for their birthstone mani's!

Base is: OPI Steady as She Rose
Purple Sponging is: China Glaze Senorita Bonita
Glitter is: Ulta After Party

Elven Gold


Awhile back I got a TON of nail supplies in the mail.  I mean, a TON.  Decals, stickers, foils, lazer foils, striping tape...you name it.  Foils were one thing I was really excited and yet terrified to use!  I've heard it's tricky, it takes practice, it can be a mess...so I picked the foil I liked the LEAST from the ones I had received and gave it a go on one nail.  It came out rather nicely though I did learn some things from round one.  The most important thing I learned: make sure there's glue on every surface of the nail!! No glue = no foil.  And there's no going back if you mess up.  Anyway a few tries later I felt I had a good handle on it so I decided to incorporate it into a mani.  The execution of this manicure isn't the problem.  It 's the concept.  The foil wasn't as gold as I thought it was and the gold I used at the base of my nails wasn't so much shiny as sparkly.  So it looks a little wonky.  But it made it 24 hours still which is a miracle given that it's foil and matte!!  

Enjoy and thanks for following!! Have you ever used nail foils?

Gold is: Orly Luxe
Green is: Zoya Veruschka
Ring finger is done with Elven Gold nail foil.

The Purple Crumpet Fairy Challenge


 A few weeks back two of the wonderful ladies in my International Swap group started up their own weekly challenge.  I don't know about you, but some days it's really a challenge for me to find nail inspiration. Especially this time of year when it seems like I'm always running a mile a minute to get everything done!! So they were kind enough to let me join in on the fun. :)  That means every Friday I'll be doing a new Purple Crumpet Fairy Challenge!  You can join along as well (all the ladies involved are SO sweet and helpful!) by clicking the link on the side of my blog.  Or just sit back and enjoy the fun along with me!!

This weeks challenge was: The Oldest Nail Polish You Own

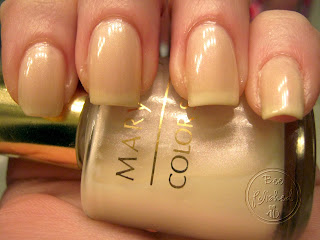
I actually LOVE this idea because it gives me a chance to give you guys a little background on my polish love.  I've been painting my nails since I was around 13.  In fact, for Christmas one year my parents bought me a little Konad-esque nail stamper.  I loved that thing...until it inevitably broke.  When I got older I started playing tennis and running track and in between sports and other activities I kind of lost the passion I had for painting my nails.  And let's face it, polish and sports are not conducive! I can't tell you how many times I broke my nails playing tennis.  So I mostly kept them wicked short.  :/  This past January I stumbled across a nail art blog called The Daily Nail.  I'm not even kidding you I spent about three hours on that page perusing EVERY single blog Melissa ever posted.  I was in love.  More so, she had stamps.  I used to have stamps.  I was  hooked.  Not just by the idea that stamping was still in existence but by the fact that there were so many possibilities to what you could do with your nails with just a few basic tools.  I rounded up EVERY single bottle of polish I could find around my house.  I ended up with 17 (which is probably still more than average) most of them were pink or sheer. Gross.  Still...I grabbed some toothpicks, some art brushes (I also like to paint!), and all my polish and I made some pretty hideous nail art!!  I also ordered some stamps.  Since then I've discovered new brands like Orly and OPI and my most favorites: butterLONDON, Barry M and Models Own.  I've learned about (and collected) dotting tools, nail art brushes, top and base coats...and a lot of stamps. Which honestly I don't use as much as I thought I would.  It's been a fun journey. And here I am, over three hundred polishes later, frantically searching my collection for the oldest polish I own.  And boy is it a doozy.  If my polish were a child it would be in high school right now because I bought it nearly 14 years ago. Without further adieu:

 Mary K Crystal Ice.  Don't fall too in love with it, 'cause I'm sure there's no buying it now!! I got this color in a grab bag at a Mary K party I attended with a friend.  Two things I learned at that party: 1) I am allergic to Mary K cosmetics, and 2) I hate sheer nail polish.  At the time, I hated the sheer, shimmery, paleness of this color.  And as a result it's been sitting in my drawer for...well, round about 14 years as I only ever used it once.  It has a pretty decent formula though, as I didn't have to thin it and it went on and dried excellently. When I bought it I didn't know about layering or multiple coats or half of what I know about nail polish now.  When I pulled this out of my drawer I was DREADING trying to use it for nail art.  And I learned that...well...I kind of love it.  It's not really a sheer polish like I originally thought, but rather, it's a jelly.  This is three coats and while it's not opaque I love the way it makes my nails look sophisticated and neat.  It reminds me of another favorite of mine, Essie Like Linen but it requires less coats and has a wonderful, subtle, shimmer to it.  So I decided to do some simple, retro nail art over the top.


 I added some tips and side 'panels' with some Barry M Peach Melba and then a little stripe of Zoya Caitlin and some dots in Orly Frisky.  Easy, pretty, and still super jelly-fied! LOVE :)  

What's the oldest nail polish you own?


Don't forget to check out what Debbie, Claire, and Kerrie came up with for this Friday's challenge!

and the peacock said...


'What is the point of this silent beauty, if I am defeated by the sound of my own voice?'

Has anyone else seen the play, Juno and the Paycock by Sean O'Casey?  I had a chance to read it recently, and it ran at the Abbey Theatre from September 21 up until yesterday evening.  It's not a happy play by any stretch as it's about the impact of the Irish Civil war, but it's informative and definitely worth seeing or reading if you're able.  Having read the play (and after seeing a lot of peacock nail art!) I thought why not do some peacock nails myself?  Of course I didn't do such a literal interpretation of them!! But I think you can see the influence. :)  Have you ever done nail art after being inspired by a book or play?

Enjoy and thanks for following!

Base is: Catrice I SeaYou
Circles are: Orly Luxe
Dots are: Models Own Prussian Blue
Top Coat: Seche Vite

Makes me feel all warm and...


This is Warm & Fozzie by OPI. It's from the new Muppets collection and honestly, upon seeing the swatches, it was the only one that made me say, "I NEED THAT."  It did not dissapoint.  This is two coats and it's opaque, sparkly, and totally smooth.  You can't tell so much from the picture but it has tiny flecks of red and green and blue and copper and gold and...yeah. There's a lot of colors in there!! When it dries it looks like a copper foil with incredible sparkle factor!  I decided to let it shine and just threw a bit more bling on the tips!  A perfect, easy, fall mani. :)

Enjoy and thanks for following!!

Base is: OPI Warm & Fozzie
Tips are: butterLONDON West End Wonderland
Top Coat: Seche Vite

Nothing's Gonna Change My World...


These nails were sort of spur of the moment nails.  I got a TON of nail art supplies from Dollar Nail Art and I've been itching to use them.  I've seen a lot of bloggers and artists using striping tape in various ways and I thought I'd try it out on something simple.  I also wanted to try out my new Orly Mineral FX collection so I started with two coats of Orly Stone Cold.  It was pretty. VERY blingy.  But a bit TOO much for me.  So I covered that with one coat of Deborah Lippmann's Across the Universe.  It's a beautiful color (which unfortunately does not play well with my Seche Vite) and it looked great over the Stone Cold.  Then I decided it was a little too blah...lol. So I popped two quick tape stripes over the ring finger and...voila! Instant nail art.  (These weren't even totally dry when I got a compliment on them from a clerk at the electronics store!).  You might notice that my thumb is MIA in some of the pictures recently.  It's because it split halfway down my nail and rather than patch it and baby it for weeks I just cut it off. The growing back process is slow :(  I think I might like the pics better without the thumb though, so I'm debating whether to leave it out or give it an encore when it grows back. Time will tell and opinions are appreciated! :)

Enjoy and thanks for following!

Base is: Orly Stone Cold
Glitter is: Deborah Lippmann Across the Universe
Top Coat: Seche Vite
Striping Tape: Dollar Nail Art

Bleeding Love


Ok. So ONE more Halloween mani!!  Last night I was kind of bored and I remembered that I had some Halloween polish I hadn't used yet--well--not Halloween persay, but creepy!!  A few weeks back someone mentioned that you could snag the Essie Morticia's Nails set for only $10.  Where I live, ONE Essie will run you $8 so three for the price of one is a steal in my book.  I even got free shipping!  They arrived awhile back and I put them in my drawer and kind of forgot about them.  Until last night.  I was watching The Simpson's annual Treehouse of Horrors with my husband and got inspired to do ONE last Halloween mani.  I keep seeing these blood drips popping up (mostly from fans of True Blood) and I thought it would be a quick easy mani I could do for today.  And it was!  One thing I love about the Morticia's Nail's set is that all the polishes inside are jelly finish.  So while I had to use a bit more red to get a more opaque look, it was also more blood-like since blood is not really opaque.  I'm taking these off tonight before I trick or treat with my neices since I'm going as a Poke-girl (pics to come!) but they're fun for the day!! Enjoy and have a wonderful Halloween!! :)

Thanks for following!

Mummy In The Middle


Halloween is one of my favorite holidays.  I love dressing up and being crazy and all the scary things that go along with it.  So I don't know why I've had such a hard time getting motivated to do Halloween themed nails.  I've seen this mummy design on a hundred other blogger's sites and this is my THIRD attempt at it.  I still don't love it but it didn't come out nearly as bad as the other two attempts!! It's much harder than it looks!  I used my Models Own black nail art pen to do the lines for that and the spider web and let me just say, I. LOVE. THIS. PEN.  It's SO easy to use and you can really get some tiny lines with it.  The spider web is my favorite part of this mani.  Oh...and the fact that it glows in the dark! I used the glow in the dark polish UNDER the nail art pen and then again over the white on the eyes so that the design would appear in the dark.  It worked great although it wouldn't photograph for anything! :/  I hope you enjoy the nails and hope everyone is having a great Halloween!! (One more creepy design is on the way :P)

Thanks for following! 

Base is: OPI Skull & Glossbones
Topped that with China Glaze Ghoulish Glow
Black is: Models Own Nail Art Pen in Black
Eyes are: Ulta Snow White
Centers are: butterLONDON La Moss
Then coated the non-designed nails with: Wet & Wild Tangled In My Web

Two coats of Seche Vite and done! :)

Metallic Stripes


About a month ago I did my first BIG international swap. And by big, I mean more than two or three polishes. This particular trade was for 6 I believe and these two were among them.  I'm really excited about this swap because it earned me my very first GOSH polish.  :)  Metallic Green.  I follow a lot of blogs and there is one girl in particular, Sam, who always posts the most AMAZING stamped nails.  Stamping is an art let me tell you and while you can create really awesome things with minimal effort if you're good at it, it can also be a real pain.  She uses GOSH metallics frequently for stamping so when I got a chance to snag one I wasn't passing it up.  This is over Catrice Dirty Berry, a gorgeous dusty purple with tiny holographic shimmer that lights up in the sun.  It didn't pick up on film well but it's sort of a purple versin of butterLONDON All Hail The Queen which is one of my favorites! 

Enjoy and thanks for following! :)


Catrice: Dirty Berry
GOSH: Metallic Green

Did you miss-a-me?


Today is my last day of vacation at home!! Tomorrow I will be headed to a bunch of places (we're doing a mini-vacation in a few places!) so I thought I'd post some nails to tide you over :P  I have a couple of things set to auto-upload but if I know blogger...and I DO know blogger...they'll never actually post.  I'll be back Sunday with new and exciting things!  These nails were inspired by a Missoni for Target dress I snagged a few weeks back (when they actually still had them!).  It's also my first frankened polish because out of all the nail polish I own it seems I don't have one rusty orangy redish one. :P  The polish on the thumb is the franken.  It was actually pretty fun mixing the colors together so it's possible more frankening is in my future.  Stash photos are to come at some point this week and it's out. of. control.  After spending HOURS swatching and numbering and organizing (I'm still not done) I've decided to cut back on the polish buying for awhile. There are a few on my wishlist but nothing serious. :)  Today I've also reached 100 followers!! So I just want to give a HUGE thank you to my followers, new and old, I love sharing with you and I've learned a lot from your feedback. :)  I haven't decided if I'll do a giveaway or not for several reasons.  The most important is that I started this blog for myself to have a place to post my passion and see how I'm improving.  I'm so excited and happy to share it with people who are passionate about the same thing and I'd like to think that you're all following along because you feel the same.  I hate the idea that someone is following me just to win something free and not because they really enjoy what I'm doing.  It's also just a really big hassle to get a giveaway together and get it shipped out.  I have A LOT of swapping going on right now and it's getting overwhelming.  And the final reason is that I've learned recently that there may be legal implications to having a giveaway.  So I'm still thinking it over and I'll let all of you know what I decide.  But thank you anyway for following along with me.  I really appreciate having you along for the ride! :)

*Side note: I've added a Blog Sale tab to my page.  If you could check it out and see if anything catches your eye that would be great. I'm trying to clear out some polish I don't use and I'd love for it to go to some polish lovers like yourselves! :)*


Base on all nails: Essie Sand Tropez
Zig Zags are:
Models Own: BlooBloo
butterLONDON: Jaffa
China Glaze: Lemon Fizz
Hard Candy The End mixed with Orly Prince Charming
Franken: Dusty Rose

Pink for the Cure!


This Monday's challenge in my Facebook group was pink for Breast Cancer Awareness.  This month being Breast Cancer Awareness month, I thought it would be a good one to participate in.  Don't forget this month (and every month) to get regularly screened by your doctor and to remind the men and women in your life to do so as well.  You can find information on how to do a self check, what to do if you find something, and even how to get support if someone you know is suffering at The National Breast Cancer Awareness website. This is a serious disease that I've personally lost someone to.  If found and treated early, the chance for survival is very good. The check is very easy, doesn't take much time, and can really save your life. If you have a minute, visit the website to see what you can do to help promote awareness in your area.  If you even tell one person you love you can make a difference.  Don't forget there are also TONS of cool products this month that are going Pink for the Cure so just by doing some regular shopping you can contribute to the cause! I hope you enjoy the nails and thanks again for following.  :)
 

Base: Catrice Miss Piggy Reloaded
Glitter coat: Deborah Lippmann Bring on the Bling
Bow: Konad White
Bow center: Barry M Shocking Pink

Week of San-X: Homekoro


It's the final day of my week of San-X!  Today I did Homekoro. Homekoro is a brown pomeranian puppy that likes to encourage his friends with praises and kind words.  He is so cute and fluffy, too!  He has a little bird friend named Uttori who I chose to do as my accent nail.  I hope you enjoyed my week of San-X (and maybe found some cute new kawaii inspirations!)  Thanks for following! :)

Base: China Glaze Lemon Fizz
Dots: Barry M Mint Green, Berry Ice Cream, and China Glaze Secret Per-i-winkle
Homekoro: Barry M Mushroom, China Glaze Ingrid, Barry M Berry Ice Cream, and Ulta Snow White
Uttori: Ulta Snow White, China Glaze Ingrid, OPI Sparrow Me the Drama, Barry M Yellow

Week of San-X: Kineizukun


Kineizukun is a little squirrel (yeah I know it seems like he should be a raccoon!) who LOVES to clean!  I love to clean too which makes Kineizukun and I a good match!  He's a relatively new San-X addition but SO cute!  I did the ring finger as his little tail and the thumb as his face. :) Hope you're enjoying getting to know my favorite San-X characters this week! Who are some of yours?

Thanks for following!

Base: Revlon All Fired Up
Dots: Ulta Snow White
Accent Nail: Essie Sand Tropez, Barry M Mushroom
Kineizukun: Revlon All Fired Up, Ulta Snow White, Essie Sand Tropez, China Glaze Ingrid, LA Nail Art Black

Popular Posts

Like us on Facebook

Flickr Images