Rehab Your Nails: How to fake a long nail bed


OK...the time has come. Today I'm going to show you how you can quickly fake the look of a longer nail bed.  This only really works with specific manicures and the best example is a french.  What you're looking at now is my bare nails.  Notice that the free edges are not all the same length.  This happens when the beds on some nails are longer than others and it's pretty common.  When my nails are polished, you don't notice the difference and they all appear uniform.  There are ways to change that too, at least to some extent but it's also why some people choose to file their nails with polish on.  I don't recommend that but filing is not the topic of the day so let's focus instead on how we can polish these in a way that makes them all uniform and also long and slim.  In this next picture, I have polished my nails with a series of different French tones. 


From left to right I have used: Sheer Nude, Bare Rose, Beverly Hills Plum and then a clear coat for the base polish. These are all by Orly (except the clear which is just Seche Vite).  I used Zoya Purity to do the tips.  There is nothing special going on here. I just did a standard French following my natural free edge.  To make them appear a bit more uniform, I've drawn the white line down a bit on some nails. If you have longer nail beds that's not going to be an issue for you but to create a larger free edge is suicide for shorter nails. You're only increasing the shortness of the bed.  So what can you do?  Here's a trick that pro's use...
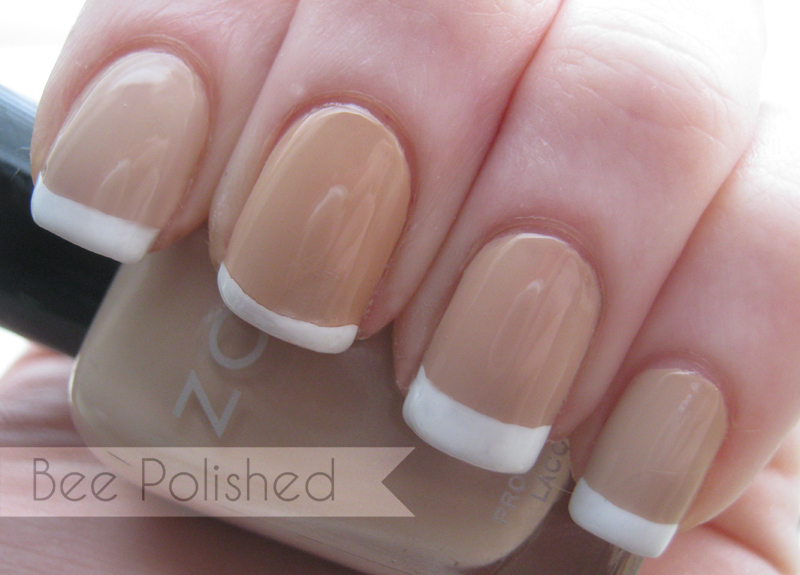
 

Start by polishing your nails with an opaque but flesh toned polish.  I've used Zoya Avery here and it looks much closer to my skin tone in real life than in this picture. You may have to do some digging around to find a good tone to match your skin. I really recommend checking out the Zoya nude tones first because they have several really great ones that should fit anyone. (I picked up Kennedy first but she was too pink for me).  Once you have your base down, polish a regular French manicure on.  Just for thoroughness I have used the same combination of French tones OVER the nude color for this manicure. Again from left to right we have: Sheer Nude, Bare Rose, Beverly Hills Plum and then a clear coat.  You can see that it affects the color of the base just as it did my natural nail bed.  Now I want you to notice what I've done with the white line.  On my index and pinky nail, the bed is exactly the length it was above. I haven't extended the bed or the free edge, I simply polished along my natural line.  Now look at my ring finger.  Here I've extended the free edge (the white line) to make my nail appear longer but my bed appear shorter. This trick works well for longer beds because it can make your nails appear longer without stunting a short bed. You can see that because my beds are longer, it didn't make them particularly wide or short looking, rather it just gives the appearance of a longer free edge.  Now look at my middle finger. Here I've shortened the free edge dramatically. now my nail looks shorter, however, my nail bed looks longer. See how easy it is? Those with shorter nail beds can use this trick to lengthen them while those with longer nail beds can use it to lengthen the free edge in just a few minutes!  Try this trick with your own nails and experiment with different sizes of white and nude to see what works best for you! :)

*Note: this trick is intended to give the appearance of a slightly longer nail bed or free edge. It does not change the actual length of your nails and should not be used to drastically increase these proportions.

Rehab Your Nails: How to shape nails

This is a quick guide to shaping your nails in a way that will flatter your hands and make your nails look the best they possibly can. I've had a lot of people ask exactly HOW to file and I'm working on bringing you a "how to" series which will address polishing, filing, shaping and some other things that I get asked about frequently.  For now, I have this mini guide to making nails look their best.  This deals a bit with nail beds and the length of your particular bed, so I feel that it fits in well with this months New Year New Nails series.  The pictures in this post are NOT mine.  I love you all but growing and nubbinizing my nails was just too much work for me! This girl did an amazing job of taking the pain out of this simple tutorial for you.  So here we go!


This first picture shows you two different shaped nails.  On the left you'll see that the nail is very short and because of the width and length of the nail bed, it's creating a square shape.  On the right we see the same nail but grown past the length of the tip of the finger so that now we have a more rectangular shape.  What I want you to notice about this is the way that her FINGER looks in each picture.  It's the same finger. The same hand. The same nail  But notice in the picture on the right how much slimmer her finger looks.  Keeping the nail length and the nail width complimentary can do wonders for the appearance of your hand! 


Now we're seeing the same effect here but with rounded nails.  Notice again how on the left the circle shape is making her fingers look more stubby and on the right her hand looks more slim and feminine.  Again, all that's changing is the proportion of the nail.  If you have longer nail beds, you may be able to carry off these shapes without much or any free edge but if you have shorter nail beds you'll need to carry more length to keep them in proportion.


Here we have two basic shapes.  On the left we have the dreaded triangle shape.  Notice the way it makes the tops of her fingers seem wider and shorter?  On the right we have the more pleasing rectangle.  Again this is slimming and lengthening the finger. The triangle shape happens to some people naturally but if it can be avoided it generally should.  You can fix this quite easily by taking in your sidewalls a bit. (Please note: You should never attempt to remove the side portion of your nail to the point where it hurts or loses it's natural curve. This can be dangerous and causes a breakdown in structure).


Finally, we go to the square vs. round shape.  This is a point of contention a lot because classically people tend to go for more oval or rounded shapes. It's a very modern and trendy thing to go square.  You can certainly choose which you like but do notice that the square shape (on the left) makes the fingers appear more wide and blunts the tips of them whereas the rounded shape (on the right) will make them appear more slender and elongate them.  If you have wider nail beds, a rounded shape may be to your advantage unless you are able to carry a lot of length.  If you have slimmer nail beds, you may want to go for the squared shape in order to give the appearance of width.  I hope this lesson in nail balancing and shaping has been helpful to you! Try out some different shapes and lengths on your own hands and watch the difference it makes!


The pictures shown on this page do not belong to me. They are from a nail care post by Into-Mind and the original post can be viewed at Into-Mind.com

Did you know...


Photo credit to Perfection Is Possible.


You can create illusions with your nails just by using some simple polish and shaping* tricks?  Make your fingers appear slimmer by going with almond shaped, rather than round or square nails.  Balance a shorter or wide nail with a squoval shape.  You can even fake a long nail bed with a neutral or opaque pale pink and a nice, natural french.  Check out next weeks New Year New Nails post to see how this simple trick can change your nails from petite to perfect in three easy steps!! And remember the rule of balance: keep your free edge to no longer than the full length of your nail bed for the strongest and most appealing look!


*Remember that shaping and filing should always be done with a grit of higher than 180. For best results, use a 600 grit and light pressure. If you have to "bevel the tips" or run the file along the free edge to remove layers of nail, your grit is too low for your nails. Most nails will be best groomed by a 600 grit.


Popular Posts

Like us on Facebook

Flickr Images