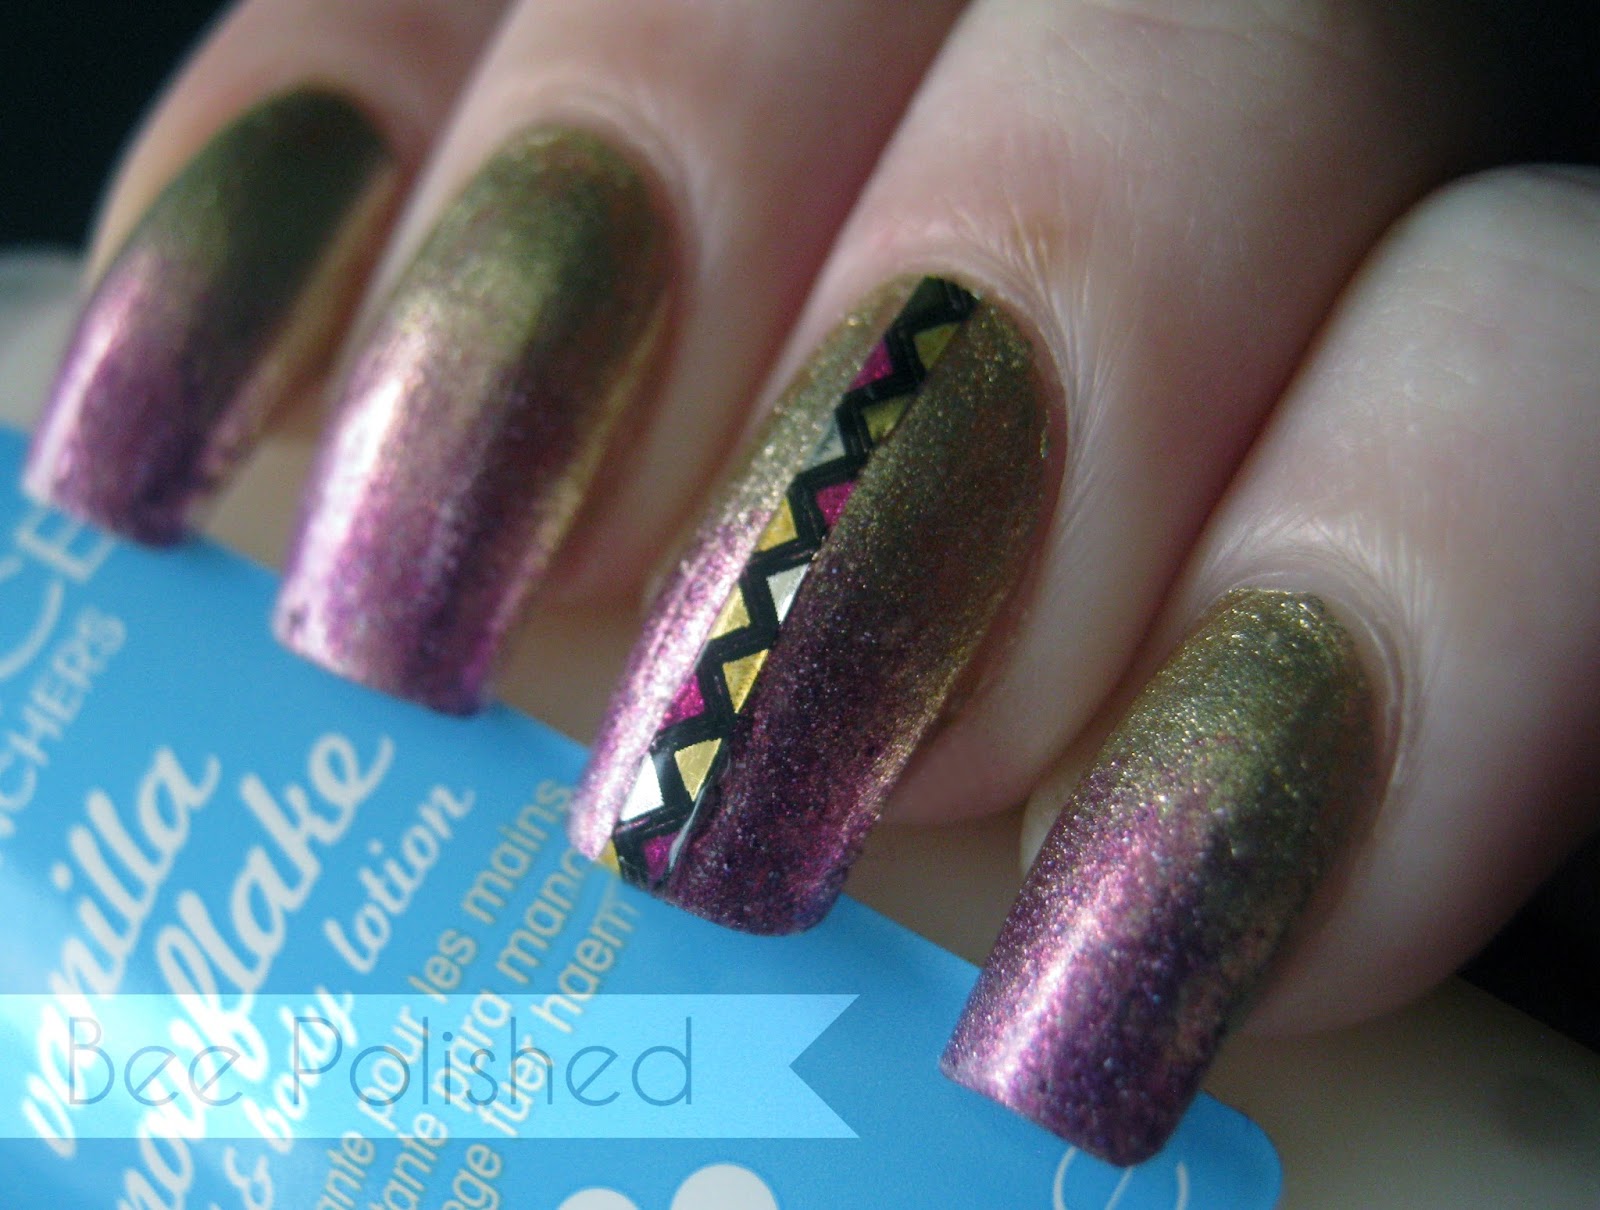
Tape Me Now...


It's day eleven of the Digit-al Dozen's celebration series, The Digit-al Dozen, Does it All Again! There's only ONE day left after today! I can't believe it! Today's challenge was a tape mani.  Last time we did tape mani's I had a little trouble with creativity! I'm just not patient enough to do them and I prefer to just make lines myself! That said, I'm always up for a challenge and I decided to go with something I keep seeing and wanted to get around to trying anyway! It's a reverse tape gradient. I used really sparkly colors for this and I think it really helped because glitter and shimmer are much more forgiving!  I hope you love the mani as much as I do!  

Please don't forget to enter the September Specatcular for your chance to win a $200 gift card! THERE'S ONLY A FEW DAYS LEFT!! And check out what my fellow Digit-al Dozener's came up with by clicking the link below!!


Colors Used:
Zoya Aurora and Orly Luxe

Tribal Gradient


Well this is a manicure born out of boredom and also a little bit of frustration.  I have these  Minx Nail Strips which I keep meaning to use in some way.  The strips are gorgeous and have a mirror like effect on the background BUT...my hairdryer has been broken for ages and I just can't seem to get them warm enough to sit nicely on my nail without it.  So instead I decided to cut the design into pieces and use them individually in different art.  So here we have a simple gradient which I've fancied up a bit a few days in with a tribal sort of strip!  I hope you enjoy it! :)  Thanks for following!


Colors Used:
Orly Luxe and 
Zoya Aurora

Of course they needed to care. It was the meaning of everything.


It's day four of Book Week with the Digital Dozen. I'm sort of sad to see this theme go but I'm also a little glad because it turns out that using books for inspiration can be a very tricky thing! Sometimes it's hard to know how much or how little you want to capture.  I love that books, unlike films, are more of a personal experience to everyone. No two people read the same book the exact same way which means each is a personal journey to the reader. BUT that also means that my version of what's important, may not be the same as yours!! Today I went very abstract for my art.  I thought of doing covers for books but again, to me it's more about the content than someone else's vision of the story. So for that reason, today may not be as easy for you to guess! It's for The Giver.  I read this book for the first time in the fifth grade and I absolutely love it. It remains one of my favorite books of all time and I've read it so many times I can't even count!  The art work today is some black trees or leaves on white to represent the sort of world that Jonas, the main character, lives in.  No color was a huge theme of the book.  I also did some black birds on a white background.  I know there were no animals in Jonas' world but to me, they symbolize the freedom that Jonas sets out to achieve. And finally, I wanted to do an apple on my ring finger because it's the first time Jonas sees the color red but I didn't feel it fit in with the abstract nature of the rest so instead I've done cracks in the red to represent the cracks in his world that the red color will lead to.  I hope you're all enjoying book week! Please check out what my fellow ladies came up with for today and stay tuned for the final installment tomorrow!!


Colors used:
Zoya Purity
Revlon Black Lingerie
Orly Grave Mistake

When it's done, it's done. And no one will know until it's done.


It's day two of the Digital Dozen book week challenge. Today I've chosen to do a mani based on a book which I enjoyed and movie which I loved. Normally it's the other way round for me. I love the book and when the film comes out I'm like, "Why did they ruin the book!?" but this film was a happy experience for me and I really enjoyed it more than the novel.  I really love books about monarchies and even though I generally stick with the non-fiction ones, this book and series is just a must read.  I wanted to use sort of "regal" colors so it seemed fitting to start with A-England's Dragon. Especially given the content of the book and the fact that it's a famous piece of English history.  Have you figured it out yet?  The book is The Other Boelyn Girl.  I wanted to incorporate the things I felt were most important in the book but while sticking with a cohesive theme so I decided to highlight some aspects of Queen Anne. If you saw the film, the necklace should have given this away and if not, surely you've seen the iconic necklace in portraits of the queen.  I also included some stamps to represent the luxe gold brooches and jewels she wore as queen.  I hope you all enjoyed this one and don't forget to check out what my fellow dozeners have come up with for today!!


Colors used: 
A England Dragon
Orly Luxe and Au Champagne

The brightest stars in Gemini...


It's time for another Lime Crime glitter!! I've already showed you Scorpio, Aquarius, and Leo and today I have another gorgeous glitter to show you.  This one is called Gemini.  It's a translucent white iridescent glitter.  One thing I love about these is how easy they are to use.  The pot above is with the shaker top off but you can also use them with the shaker intact.  It has three little holes in the top for easy access and you can simply tap it onto your nail OR you can tap it into the lid and use it that way.  For today's nails I polished with a white base and then just shook the container lightly over my nails.


Here's the result!  I left these top coat free because it seems to be a new trend to have slightly textured nails.  Plus they have this amazing sparkly quality to them which was intensified by the matte base color.  I LOVE the way this one shifts with rainbow-y flashes in the light.  It's very angelic looking.  This actually stayed on really well too even without a top coat.  And even though it had a slightly textured look to it, it didn't feel super gritty or catch on anything. This one seems understated but it's really not! It's a real stunner.  Here's a close-up...


You can pick up Gemini or other Lime Crime Glitters at Lime Crime Makeup.

Colors Used:
Orly Au Champagne


This product was sent to me for my honest review. I have not been compensated for my opinion.

Flashback Friday: Betsey Johnson


It's time for another Flashback Friday!! It's been awhile since I did my last one and it took me a little bit to decide what to recreate! I think this one is a good one because it's a combination of French manicure, moon manicure, and freehand vs. stamp.  It's from March of 2011 so almost two years ago. See when I first started doing nail art I wasn't part of any nail groups online.  I hadn't done much research and I wasn't really that great at doing much more than some dots.  So I invested in some stamps and for my first BIG challenge I did THESE nails....warning: they are a HOT. MESS.


I started this blog, as I'm sure most of you know, because I was sharing my nail art all over my Facebook page and texting it to my friends and family and I wanted a place where I could just put it up once and everyone could see it.  It was also intended to be sort of a personal journal of my art. So naturally, clean-up, photography and other blogger no-no's weren't really a concern of mine.  I polished. I took a quick pic. I uploaded it with a color list. I was done.  Originally, I used a stamp to do the leopard print and now, I'm able to freehand it.  I really prefer the freehand version too because the print is a bit bigger and it makes the design less busy.  Originally I used a tip guide to do the pink tips.  For the second version I free handed them.  I've always been fairly decent at free handing tips so I don't know if that's really an improvement BUT for the original I stamped and then had to figure a way to color OVER the stamp so I did white and then pink and ended up with super thick tips.  For the new version I used a cotton swab in acetone to remove the gold from the tips and then filled it back in with the hot pink.  For the original version I used a guide for the moon and for the new version I free handed it.  For the original I stamped a white bow and then tried to fill it over with a pink. For the new version I used a white/color single stamp technique to do it all at once.    I think of all the mani's I've done this one probably shows the MOST progression. I love it both ways though!  It was based on some Betsey Johnson earrings I got from my husband. :)  I used two of the same colors for the new one: Orly Luxe and Prince Charming.  For the black I used Zoya Raven for the new one and since I don't have the pink anymore either I used butter London Primrose Hill Picnic for the new version.  Which version do you prefer?  How much do you think you've improved since you started?

Peaches and Cream


I have some pretty simple nails for you today.  I'm still working on using textures on my nails more often but this time of year work gets busy and it just gets in the way.  These nails were inspired by an outfit I had on. I used Barry M Blue Moon for the base and then Orly Prelude to a Kiss for the accent nail and the tips.  Then I took a sticker of lace and pressed it into the accent.  Two coats of Seche and done!! I love that they have a sort of vintage appeal and they're soft and girly without being pink and sparkly! Have you ever done nails inspired by something you had on?

Charmed, I'm sure...


So you all know I've been doing a Project Runway series this year.  I don't know why but I feel like this season is some of the least inspired designers to date.  I just can't really get into any of the contestants.  My favorite? Buffi Jashanmal.  Who, incidentally went out very early in the season.  Not that I really thought Buffi was going to make it to NYFW because let's face it, her aesthetic is not very public friendly.  Girlfriend is rocking leopard print hair for Pete's sake!  But I loved her bubbly personality and her fun outfits.  Despite having a wholly unappreciated style, she managed to stay true to herself and make things that were always fun to look at!  And...OK I totally loved her accent too!! She's kind of like an untamed Betsey Johnson and we all know I love Betsey.  So I decided to do some tribute nails to my favorite fun designer this year.  Below is my tribute. These are very similar to the nails Buffy was rocking on her very last challenge day.


I used Barry M Cyan and Shocking pink for the bases and then sponged Orly Luxe onto the tips of the blue ones. :)  Happy nails!  Thanks for following along with me!!

Can't REaD My Poker Face...


...AND THE GRAND FINALE!! Ok, let's face it; these aren't that exciting.  The colors from yesterday reminded me SO much of poker cards.  The combo got me thinking it might be fun to add some poker type art onto it.  I didn't have a ton of room to do anything super elaborate so I decided to go with just a little dice in the corners.  I think it came out pretty nice actually.  It's not a mani I'd have done otherwise and I don't think I've ever even looked at this dice stamp before.  But I think that's one of the cool things about it.  The challenge really pushed me to go outside my comfort zone and do something different.  That said I'm still not going to be rocking the red nail trend anytime soon. BUT I appreciate the creative process of what I did here. :)  AND I'm super proud of myself for actually completing a five day NO removal challenge.  It was more difficult than I suspected but it was a lot of fun!! I hope you all enjoyed the series!  Thanks for following and check out my fellow red lover's blogs to see some more awesome art work!!!

IncREDible


Day three is here!!  It wasn't hard to decide on something to add to yesterday's mani since it was so simple.  I started with the little black swirls in the gold and then decided to add a dot on the top.  After that I thought I might tie the gold in a bit more so I did some gold dots on the other side of the red as well.  In retrospect, I probably should have just added the dots or JUST added the swirls because there isn't much room to add onto this mani which was a lesson I learned the next day!!  But I'll let you decide if I handled it well when tomorrow rolls around!!  I hope you're enjoying following along with the series and don't forget to check out what my fellow challengers have come up with for today!! 

Red-dy for my close-up


Day two of red week is here and I really think this was my favorite day of the challenge for me.  I know I shouldn't say that since it kind of ruins the rest of the week...lol...but I promise there are still cool things coming.  I just really liked this simple contrast.  I didn't know what to really do with the dots from yesterday and didn't want to add a ton more so I went ahead and turned them into a solid gold panel on my nail.  Then to add some pop between the gold and the red I added a thin outline of black with a Models Own nail art pen. It crossed my mind to stamp over one side of this or the other but I just couldn't stop admiring how clean it looked so I decided to edit myself and leave it as is.  If you're just starting to read along with the challenge, don't forget to check back at Day One to see what I started with.  Tomorrow things start to get a little bit crazy!! So stay tuned!!

And don't forget to check out what my fellow Red-skateers are doing for the challenge!!

There's no wrong way to wear a mani...


...and we're about to see just how true that is!!  It's theme week over at The Crumpet and the theme is red.  Debbie has graciously allowed me to join her in red week and that means you're in for a week of red nail art.  I NEVER ever use red, even though I have tons of them so this is going to be a little outside my box!  But hopefully you'll enjoy the series anyway. :)  To further challenge myself over the next five days I've added a little bit of an extra rule to my red week: adding only and no removing.  That means that what you see today is the base for what will happen over the next five days.  I won't be removing anything from my nails I'l only be adding to the design.  It seems like an easy plan and it is for the first three or so days but when you get to day four and five it starts to get a bit tricksy!  I've started here with a GORGEOUS red, Orly Grave Mistake.  I added a few gold dots in random patterns with Orly Luxe.  Stay tuned tomorrow to see what I add to this artwork!!   Don't forget to check out the other ladies participating in Red Week!!

May the odds be ever in your favor...


Today's Hunger Games mani centers on the capitol.   The Capitol is the wealthy, flashy, city which all the districts work to maintain. It is also the only major city to be mentioned in the series. It is thought to be located in the northwestern section of the former United States of America, seemingly in the Rocky Mountains. It is likely that it is in the current day state of Colorado, Utah, or Montana. Residents of the capitol dress in very outrageous fashion, even dying their skin and wearing various wigs.  These nails are based on the nails that Effie Trinket famously wears during The Reaping in the films.  Since there is no color in the China Glaze collection to represent the Capitol, I had to choose my own! I started with a base of China Glaze Wicked Style, which was not only fitting color wise, but also a VERY fitting name for the nail art!!  Then I sponged Orly Luxe lightly on the tips and up to about the halfway point of the nail.  These are really fun because the amount of gold flashes differently in different lighting ranging from very evident (as shown above) to just a glimmer.  I hope you've all enjoyed the series!! I have something REALLY exciting for you coming up.  Another series!! This one is going to include some other bloggers and it's based on something I REALLY REALLY REALLY love.  So I can't wait to share it with you. Stay tuned...

Thanks for following!!

Visit the previous district: Graphite Mining/Nuclear Power


A Day Late and a Design Short


So these were my St. Patricks Day nails. And they are obviously a day late.  They are also quite obviously lacking in the design department.  I had literally ZERO time to do my nails for St. Patricks which makes me epically sad because I love holiday nails and last years were so much fun!  I got through one hand before I fell asleep and then when I woke up from my accidental nap I had to haul butt to get to work with yes, one hand polished. *sigh* Maybe next year!  Anyway the base on these is Color Club Twiggie. Then I stamped shamrocks on with China Glaze Agro, Orly Luxe, and Barry M Spring Green. Enjoy and thanks for following! Hope you all had a fun (and SAFE) holiday!!

More skittles please...

Thumb to Pinky: China Glaze Sweet Hook, Zoya Caitlin, Models Own Feelin' Blue, China Glaze Kinetic Candy, OPI Thanks a Windmillion


Today's challenge presents a valuable lesson in why I hate doing my nails in clinic at school.  A little background on what clinic first, in case some of you are unsure.  I started school for Nail Technology on January 18th.  In my state, the law requires that I have 200 hours of practical work before I can graduate and take the state board exam to obtain my license.  This means I must spend 200 hours working in a salon in order to graduate.  Since an actual salon cannot hire me until I have graduated, or at least, not to actually work on clients, we get to work in the school's on site Spa/Salon where we work on clients to get our hours.  Some days are wicked busy and I have client after client.  Other days are incredibly boring and those are the days when I usually do my nails or one of my classmates (usually Pauline...you'll see some of that VERY soon!).  Or occasionally, I actually do them in class.  The good thing about clinic is that it's usually pretty fun and it's a lot of free time where I can do my nails.  The bad thing about it is that it means I spend 70 or more hours away from my house which makes me extremely tired during the week. :/  The nails above were done in clinic.  Our clinic uses OPI products, though we have a handful of Orly and China Glaze polishes, and most of the polish choices are from the Pirates of the Caribbean collection so I usually bring my own.  Have you ever tried to bring 600+ nail polishes to school with you?  Yeah. Not so much.  I estimate that I have between 70 and 100 that I am able to comfortably (sort of ) take with me from home to school everyday.  Apparently I should have included more pastels in that count.  I chose the most pastel-y colors I had for this one and it still came out kind of bold for a pastel skittle.  So...when I got home I did them over...


Much better, no?  For the second skittle I used Orly Prelude to a Kiss and Models Own Bloo Bloo, Beth's Blue, Pastel Pink, and Utopia.  I'm going to try to be more prepared for the next few challenges!!  Thanks for following!

Which skittle do you prefer?

Patch Me Up


Today's Spring Challenge was patchwork pastel nails.  I was a little intimidated by this one.  I've seen some really nice patchwork nails and then some not so nice ones.  I've played around with patchy nails in the past and didn't really love the results but I must say I rather impressed myself with this one.  It came out pretty nice on the first try!! I think adding the white lines was really what made it come together because before that it looked like a hot mess!!  I don't know that my colors are really 'pastel' per say but they're very Spring!!  I started with a base of Barry M Peach Melba and then added random lines using China Glaze Kinetic Candy, Models Own Pastel Pink and Orly You're Blushing. Then I added white lines with an LA Art Nail Art striper in White.  I hope you all enjoy and thanks for following!!

Stitched Up


Today's Purple Crumpet Fairy Challenge is Pink Polka Dots.  I actually cheated a little bit on this because I'm not using pink. But...this is a peachy-pink and it's SO very pretty that I'm using it anyway!  I wanted to do something simple but fun for these so I went with some simple alternating colored dots. :)  I used Orly Prelude to a Kiss and You're Blushing from the new Spring Cool Romance Collection.  Easy and pretty!! (please excuse the AWFUL lighting on this. My mouse is AWOL for my computer to light editing is impossible and the lighting I have available to take photos in SUCKS. I encourage you to google swatches of these because they're WAY prettier in person!!)

Thanks for following!!

A Very Merry Un-Spring Color...


Today's Purple Crumpet Fairy Spring Challenge is a non-Spring color.  I actually have quite Spring-like nails at the moment and don't really feel like taking them off so I'm using this picture of a mani I did around New Years.  I was somewhat inspired by the swatches I kept seeing of the Essence Circus Circus polishes and wanted to re-create the gold on black look without buying them. Even though this didn't do much to stifle my lemming it was really quite lovely.  I used Orly Goth as a base and then put two coats of China Glaze Blonde Bombshell on top.  It has little silver and gold glitters as well as larger gold glitter flakes which were GREAT for New Years!  I hope you all enjoy and thanks for following!!

Fool's Gold


This is actually a mani I did for Christmas which never made it to my blog.  Since it's pretty cold outside though, it's still a nice winter mani! It was surprisingly easy to do even though it looks kind of intricate which makes it one of my favorite kinds of mani!  I used a base of Barry M Gold Foil, but then because it had a much flatter finish than I expected it would, I put two coats of Essie As Gold As It Gets over the top.  You can't see it very well in the picture, but it gave it a nice sparkly finsih that was a little more what I was going for.  Then I used Orly Ma Cherie for the red lines and dots and Orly Wild Wisteria for the green ones.  I entertained the idea of putting some gold in the centers of the green but then decided to leave it as it was!  I hope you guys enjoy and thanks for following!!

Mehndi your business...


This was kind of an experiment of sorts.  I was trying out my new Illamasaqua polishes and after I put Baptists on, I didn't want to take it off!! So after a day or so I decided to make it a little more flashy with some art.  I picked an Indian type print off one of my stamping plates and then finished the design and added some extra flair with a dotting tool and an art brush.  This color is SO much prettier in person.  It's a deep shimmery purple with a rich, luxe finish.  I wish winter didn't force me to take these pics inside under an artificial light. :( But I'm REALLY going to try to convince my  husband to get around to my lightbox this weekend!! Thanks for following and enjoy!

 Illamasqua Baptiste with Orly Luxe stamp and freehand art.

Popular Posts

Like us on Facebook

Flickr Images