Buried Chocolate...


The sun is finally out again!! It's been dreary and rainy here for some time now and while we definitely needed some rain and cooler weather, it wasn't so great for my nail blogging pics!  So the sun is out and it was a perfect opportunity for me to give this little gem a go on my nails.  The base on this is Orly Buried Alive.  It's just an absolutely stunning polish as you can see!  It has a deep mahogany jelly base which is just crammed with coppery shimmer.  Gorgeous.  Since I have another 'brown' glitter in my collection I thought I'd marry the two and see what came of it.  I think it came out rather lovely myself.  The tips (and base on my accent nail) are Lynderella Choco-latta Love.  It has colored glitter as well as smaller brownish glitter in it and mostly the color is what shows on these nails.  The only flaw with the Lynn is that it's very chunky and I found the clear base to be very thick and difficult to work with.  I don't know if thinner would have helped any as I didn't try it but the effect is still quite nice on the nails!  I hope you're all having a wonderful weekend!!

Neon Sunset


So recently I decided to try out a splatter mani.  I started with a white base and then splattered Orly Glowstick, a ridiculously bright yellow, over the top.  But...I didn't love it. It was too subtle and the splatter wasn't quite what I thought it was going to be.  So I decided to play with putting something over the top to mask the messy splatter and salvage my mani!  I ended up with these stripes.  I started with horizontal stripes but after I got two on I decided I didn't love it so I went with diagonal and then decided I liked the look of the contrasting stripes and the neon boldly peeking through the cracks!  This was one that even caught my husbands attention so I know I did something right! :P  Have you tried a splatter mani?

Spot me a tenner?


So by now I'm sure you've all heard of the elusive OPI Spotted polish.  It was a limited release, only available at Sephora.fr.  For whatever reason, in the US (and all other countries to my understanding) we got saddled with yet ANOTHER shatter polish (though, admittedly a pretty sparkly teal!) to go alongside our Spiderman collection.  Yet France got this amazing gem.  It's not really a shatter but it definitely has a sort of similar 'spread' effect on the nails.  One thing I learned very quickly with this polish is that it definitely doesn't apply like shatter!  Spotted is VERY thin and if you use more than a bit it runs all over the place.  You can't just apply it either. In order to get the best spots you need to repeatedly run the brush over the wet polish until you get a nice amount of little bubbles.  They do change a tiny amount as well as the polish dries.  But despite a bit of a learning curve, I'm totally loving the effect on the nails!  I tried it over several things including neons!! But I think I liked it best over this duo-chrome, also from the Spiderman collection, called Just the Spotted Lizard.  An apparent dupe for Chanel Peridot, this polish shifts from green to gold and it looked SUPER cool under the spotted. VERY lizard like!  

Thanks for following! Do you like Spotted more than Shatter?


There's gold in them thar hills!


 It's time for another Monkey See Monkey Do Monday!! But before I get onto the art work I want to introduce you to one of my most favorite polishes!  It's Catrice In The Bronx.  In the Bronx is a bronze-y, coppery, shimmery delicious polish which is an absolute dream to work with.  It's a metallic, which is great but it's not flat like some other metallics I have (Barry M Foils, I'm looking at you).  Instead it's laced with endless amounts of shimmer and it's just gorgeous in the sun AND in the shade.  This is two coats of it and you'll notice that there's no streaks, no balding and a wonderful shiny finish.  It's just amazing and it ranks in my top ten polishes in my collection.  Yeah. I love it THAT. much.  So what better a choice for my Monday mani?  For this Monday I wanted to do something subtle (I know, never!) and I wanted to try out a new technique I've seen floating around the blogger world.  Cling wrap manis...you heard that right.  Cling wrap.  This is actually REALLY easy and it looks great but it's a bit tricky the first go round.  Here's my mani:


I used Catrice In the Bronx for my base and then I topped it with Seche Vite (cause I'm super impatient!) and let it dry for roughly 30 minutes (just to be sure!).  Then I added a single coat of Orly Green With Envy.  Then I used a wadded up plasic bag (I didn't have any cling wrap) to press lightly into the polish, thus lifting off parts of the green.  I did one nail at a time and wiped the plastic in between with a paper towel so I could reuse it.  I also only pressed once per nail although I've seen people use smaller pieces to press numerous times.  The only advice I really have is to press gently and to realize that the polish will spread as it dries so even though gaps look pretty big when you initially press, they'll close up some.  My pinkie was the first nail I did and I used a lighter touch with the others but you can see the difference in effect.  It's something I'd definitely like to do more with in the future!!!  Here's the original inspiration:


It comes from Jems from Jenny. She used a more red toned base and a brighter green, but the effect is the same.  These are so easy! It's definitely art that anyone can do and it only takes a few minutes which is another big plus!  Have any of you done cling wrap nails?

Zoya Gloss Collection

Today I have some new swatches for you! The Zoya Gloss collection.  It's a collection of three, layer-able jelly polishes.  I'm a huge lover of jellies in general but the problem with them is that they often have a finicky formula.  Some are too thin, some are too thick, many are streaky and difficult to get an even look from.  I'm happy to report that these are none of the above.  So let's get on with the swatching, shall we?


I'm starting with Zoya Paloma.  Paloma is a bright, raspberry toned pink polish.  I used three coats here and it's still not opaque (jellies never really are!) but there isn't an obvious nail line either which I really liked.  It's SUPER glossy, even, and still has that squishy quality about it that makes me love jelly polishes!  This one has a nice, bright color to it so it would be perfect to wear with less coats as well.  I think Paloma was my favorite of the bunch.


This is Zoya Katherine.  Katherine is a red-toned aubergine according to their website.  I think that about sums it up though.  It's definitely an eggplant hue but it's just a smidgen on the red side.  I thought I was going to dislike this one after the first coat but here we are at three again and it's just perfect.  These were all so easy to work with.  They even out nicely on the nail with little effort and look how glossy this one was when it dried!  They don't even need topcoat! Perfection.  This one was originally designed for Peter Som during NY Fashion Week.


Finally we have Frida.  Frida is a teal toned jelly and it was the one I expected to like the most.  But it's also the most sheer of the bunch and unfortunately, teal nails just never look appealing when the polish is sheer!  This is three coats and you can clearly still see VNL which was a surprise to me given how the other two built up.  That said it's still a really gorgeous shade and the formula was still a dream on it.  I can see myself wearing it in the future but more likely as a jelly sandwich of some sort than just as a color on its own. 

Overall these are great polishes.  No streaks on the formula, no unevenness (which is common with jelly polishes), rich colors and an unbeatable glossy finish.  Which one is your favorite?

Lime Crime: Les Desserts d'Antoinette


Today I have something SUPER exciting to share with you all!! Lime Crime's new polish collection, Les Desserts d'Antoinette. There are a few reasons I'm excited to share these with you, and only one of them is that I'm totally obsessed with Marie Antoinette!  If you're not familiar with Lime Crime, they are a cruelty free, vegan (they do have one product which contains beeswax) company which was born in 2008.  Until recently, the majority of their product line was eye shadows and lipsticks but they recently added nail polish and are currently adding a line of face products.  I do have a few Lime Crime eye shadows and they're lovely so I was interested to see how the polishes would be. So how were they?  Well here we go....


L to R: China Glaze, Lime Crime, OPI


I'm starting with the brushes on these because I was surprised at the brush in the bottle!  Here I'm comparing Lime Crime's brush with a China Glaze and an OPI brush.  Since it comes in a shorter bottle I expected a thinner brush a la China Glaze but if you look at the picture you'll see that it's much closer to the wide brushes of OPI.  It's not quite as wide as the OPI but it's wide enough to cover the nail easily yet not so wide that it's not feasible for use on toes!  The cap and brush are shorter than a lot of commercial brushes; I'd liken them more to a butterLONDON brush where length is concerned.  There are seven polishes in the Lime Crime line, and here they are...


This is Milky Ways.  It's an off white polish intended for use with French manicures, but I'm in love with it on my nails.  It's almost got a hint of peach to it and it's a perfect soft white polish.  I could see myself wearing it just as is rather than as a French manicure.  The formula on this one was amazing.  With whites and cremes I usually find streakiness, unevenness, and thin formula.  This was none of the above.  This is two coats and there isn't a streak in sight!  It also dried to a shiny finish (there is no topcoat on these!) which is another big bonus for me!  I think this turned out to be my favorite of the bunch!


Next up we have Crema de Limon.  This is described as a pastel yellow but I think it leans a little more on the bright side than pastel.  I have a few pastel yellows and this is much more pigmented than any of those but it's not bright enough to be neon or unflattering. Like with Milky Ways there were no streaks, no unevenness and it dried to a shiny, glassy finish.  I don't know that I would have chosen this color for myself if I were buying these but it was actually very flattering on me which is surprising since yellows normally hate my skin tone! 


Then we have Peaches ♥ Cream.  This was my least favorite of the bunch.  It again is not really pastel but also not neon.  It's like pastel on a night out! Very pigmented and very vivid.  I didn't love it on my skin tone but even though it has peach in the name, they do describe it as an orange on the website which is much more color accurate.  I had some issues with formula on this one.  Even though all the polishes have the same viscosity, this one seemed to want to drag and streak a bit.  This is three coats and it evened out nicely but it was the only one of the bunch I needed three for.  It did dry shiny and glassy like the others, but it wasn't my favorite to work with. 


Here we have Parfait Day.  I'm just going to throw it out there...for a pastel collection, these are very intensely colored.  This one was no different than the others.  It's not as soft as you'd expect a pastel to be but I really loved this one.  I'm not a pink person by any means but this has the right amount of softness and femininity and just a punch of fierce.  No complaints on the formula on this one either.  Two coats, no streaks, shiny finish. 


This is Lavendairy.  This one surprised me a bit.  It really reminds me of Barry M Berry Ice Cream.  It's purple...but wait...it's also pink?  It's a very warm, pink toned purple and again it was very intensely colored.  These are not your grandmothers pastels.  The formula on this one was great but it didn't dry as shiny as the others.  I'm not sure if that's something to do with the pigments but it had a more semi-matte, neon type of finish.  Nothing a bit of top coat wouldn't take care of though.  This is another favorite for me.  It was super flattering and I like that it's not a straight up purple. 


Here's Once in A Blue Mousse.  This was another pleasant surprise for me.  It's blue and it's sort of pastel, but it has just a hint of soft green in it.  It really gives the color dimension and it was SUCH a pretty color.  Other than Milky Ways this is a favorite for me.  It was so gorgeous I hesitated to remove it to finish my swatching!!  I had a hard time capturing the color on this so it's more intense than what you see in the picture but the basic color is accurate.  It's not pastel but it's soft and rich.  No formula issues on this one.  This is two coats and it dried to a shiny finish.


Finally we have Pastelchio.  This one is a stunner.  It's literally almost a neon but it just hinges on that line of crossing over!  It's bright, intense and in your face.  I was surprised at how intense it really was when it was on my nails!  It did dry to a semi-matte type finish same as Lavendairy but again a little top coat solves the problem nicely.  The formula was lovely on this one, two coats no streaks, but beware of using a base coat on this one!! I didn't and I should have (duh) so I did get a bit of staining from it but nothing serious.  Actually I'm surprised it didn't stain worse with no base coat but I also didn't wear it for an extended period of time!


Overall, I'm really impressed with these.  I think the formula is on par with high end brands and the retail on these is $5.99 each which puts them at practically a drug store price point.  They're not thin but they're not super thick either and for the most part they only need two coats. The wear time on them is good, although I've only had them a day so I can't speak too much on how they wear.  So far so good and I have no chips or issues yet.  I love that they're unique colors, I haven't seen anything like them before and with over 900 polishes in my arsenal that's really saying something! I also love that they're vegan and three free! I'd love to get more of these in the future! Thanks for following along with me! I hope you enjoyed this collection!

Do you have any Lime Crime polishes? How do you like them?


Lime Crime products can be purchased at the Lime Crime website. They retail for $5.99 each or $39 for the set.  These products were provided to me for review by the company.  All opinions and thoughts expressed are my own and I have not been paid for them.

Monkey See Monkey Do Monday: Sold Out Seventies


It's time for another Monkey See Monkey Do Monday challenge!!  This week I chose a design from a French blogger named Camille.  Her designs are mostly simple but also very stunning!  You can read her awesome blog in English but I prefer to read it in French! :P  So don't let the language barrier stop you from checking out her page!  At any rate I didn't have the two polishes Camille used in her design so I chose to use Catrice Sold Out Forever and Barry M Block Orange.  It had a very seventies sort of boho vibe to me.  I really had to resist adding some additional details and I also simplified a bit by doing only one accent nail versus her two!  I do like the contrast of colors on hers better.  She used a more red-orange and a green which was a bit warmer.  But I still loved the look on me!  Thanks for following along!!


The Hungry Asian: Twenty Ten


Today I have another swatch for you!  I'm really working on my swatching but I have a sort of sub-par camera and I'm not really interested in upgrading it anytime soon!! So instead I'm experimenting with different lighting and modes on the camera I have.  Hopefully you can all see the improvement!  At any rate this is a Hungry Asian polish called Twenty Ten.  She describes the polish as:

"...small square red glitter, micro-fine and small blue hex glitter in a sheer black base. This color was one of my first ever made, it has had a few versions over the last couple of years and I am quite happy with this final one."

...and that's pretty accurate.  It's definitely a jelly polish and it's fairly sheer on the first two coats.


This is three coats in natural light.  I really love the formula on this.  Even though it's pretty packed with glitter it's not thick or lumpy and the glitter spreads pretty evenly on the nail without having to "place" it like you do with some glitters. On the downside, it didn't dry to a very shiny finish and it was a little bit gritty.  Not a crazy amount or even an amount which was unexpected given the amount of glitter in the polish. Still, a topcoat is necessary with this polish.  I used one coat of Seche Vite and it dried smooth as glass so it's nothing you need anything special to conquer!

Here's a macro shot so you can see all the glitters!


Gorgeous, isn't she?  You can see on the macro too that there is a little bit on VNL but on the far shots you'll notice that it's not incredibly obvious from a distance.  I personally LOVE jellies so a bit of VNL is nothing that bothers me but I'm sure this would also be lovely over a few coats of black creme.  (I did three coats on all pictures).  Overall I really loved this polish!  It's fun, pretty, and easy to layer or use as a fun topcoat.  I'd certainly purchase more Hungry Asian polishes!

Thanks for following! Do you have any Hungry Asians?


Hungry Asian is an indie polish brand available on Etsy at: http://www.etsy.com/shop/TheHungryAsian.  They retail for $9.25 for full sized bottles and $4.50 for a mini.

Peachy Sheen Glitter Queen


I'm so so in love with peaches this summer.  I have no idea why because for a long time I avoided them like the plague.  They seem to scream "old woman!" to me...but ever since someone sent me a gorgeous coral-y Leighton Denny called Hepburn, I can't get enough.  I also love that peach tones look great with my skin tone and they're soft and girly but not pink or red!  I was itching to use my other new Tokidoki polish this week so I decided to sponge it over another color in the hopes that glittery tips would hold up at work (which they actually did!).  The Tokidoki polish, Savana, is gold and pink microglitter but I was really hesitant to use pink for the base so I decided instead on this peachy color from Barry M.  It came out looking absolutely magical.  I love it!  The pink micro glitter is just soft enough that it doesn't clash with the peach and the effect was super soft and just a little bit flashy!  It also has a bit of a vintage vibe to me, which you know I love!  I hope you all enjoy and thanks for following!!


Colors used:
Tokidoki Savana
Barry M Peach Melba

Flashback Friday: Sew DC


So I'm starting this new thing called Flashback Friday.  It's not going to happen EVERY Friday but here and there I'll be recreating nail art from my early days!  There are a lot of mani's that I really wanted to come out differently than they ended up and I just didn't have the skill level to take them there.  So I'm going to start re-doing them and hoping that now I have the skillset to do them properly!  It's also a bit of a chance for you, as my readers, as well as myself to see how not only my art skills have improved, but also my photography skills.  So this is the first of my flashbacks.  The original art work: Sew DC, was done in March of 2011 so it's been nearly a year and a half since they were first done.  They were based on a pair of DC shoes that I have which I still have and still absolutely love!  Here's the original picture:


The main problem with the original is the photography skills.  My nails didn't take up nearly enough of the frame, it was taken in bad artificial lighting and it's way too dark.  There's also a severe lack of cleanup and unfortunately, I couldn't get away with zero clean-up at that time!  Originally I used five coats of Essie Like Linen and then waited an inordinate amount of time before stamping the flowers on using Essie Sew Psyched, Orly Prince Charming, and Revlon Fuschia Fever.  This time I used three coats of the Essie Like Linen, since I realize now that the base doesn't need to be completely opaque when you're using stamps to cover the entire surface.  Then I used a coat of Seche Vite and about 20 minutes later I was able to start stamping.  I was a bit less random with the stamping this go round and since I no longer have Revlon Fuschia Fever, I subbed Max Factor Disco Pink.  Both are hot pink creme's but it turns out that the Max Factor is a bit less sheer when stamped.  Overall I think I like the new version better.  I used less stamps to let the base show through more and I like the pop of pink.  These are still some of my most favorite nails I've done!!  Which version do you prefer?

Koh! Blue Universe


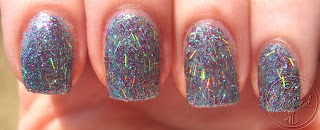
I'm so excited about this post! I got my VERY first Koh! polish this week from a super awesome nail buddy and it. is. gorgeous.  This is Koh! Blue Universe.  It's a murky navy blue polish with micro silver glitter and rainbow flakies scattered throughout.  It's so much prettier on my nails than I ever expected it to be.  The formula on it was a little on the thin side but this is two coats and there is no VNL so I can't complain about it too much!  This pic is in natural light and you can already see the goodness of it.  I wanted to take a full sun picture because it's just AMAZING in the sunlight but unfortunately the sun isn't cooperating with me at the moment so this is all I have. :(  I really love this color though and I'll certainly invest in more Koh! polishes at some point in the future.  They're a bit pricey but this one at least, was worth every single penny! 

Thanks for following! Do you have any Koh! polishes?

Give me all your neon...


It took me a little while to jump on the neon bandwagon.  I've seen a lot of people with the neon nails and to be honest, I LOVE the look on people with a bit of color but on myself...I just don't know.  I feel like I'm too pale to carry it off.  That said after hauling a huge amount of them for some friends I couldn't resist picking up a few for myself.  I first used them in a much more subtle mani with just some neon stripes running through black.  But I've finally bitten the bullet and done a proper mani with neon! So here they are!  Kitty pirate neon nails!  I actually quite liked these nails in the end and as a bonus my camera did a really decent job at picking up the neon color!  They were SUPER bright!  I hope you all enoy them!  
Have you tried the neon trend yet?


Colors used:
ChG I'm With The Lifeguard, Hang Ten Toes, and Sun-kissed
WnW Black

Did you know...


...your nails need to be conditioned regularly?  Think about this:  how many times do you wash your hair without using a conditioner after?  What about this:  how many times do you wash your hands without using cuticle oil after?  Your nails are made out of the same thing as your hair and they need conditioning just the same!  It's difficult to try to use oil every single time you wash your hands and lotions just don't cut it so aim for twice a day to keep nails looking and feeling healthy!  If you're wearing polish, you should be using a cuticle oil with carrier oils so that the oil will penetrate the polish and do your nails some good (I like Avoplex from OPI or Solar Oil from CND).  Here's a quick and easy way to keep hands AND nails looking great!


You'll need:
Cuticle Oil
Lotion 
 (use a good moisturizing lotion like those made by Hempz OR sub a rich shea butter or other pure moisturizer.  Try to avoid cheap lotions which contain mostly alcohol and are drying to the skin)

Hold your hand palm up with all fingers bent inwards towards your palm.  (Just like how I take my pics!!)  Now swipe or drop cuticle oil over all your fingers and your thumb.  Using the tip of your thumbs, work the cuticle oil into your fingers (remember this is for your nails AND the skin around them so be sure to include all of it!). Then use your finger tips to rub the oil into your thumb.  Your hands should never leave the position they're in while your doing this!!  Continue for a few minutes until most of the oil is absorbed and then apply the lotion as you normally would.  Voila!  Beautiful nails AND hands!

It's not my fault you're like, in love with me, or something...


Pink Wednesday!!! I'm actually participating this week...but mostly it's because I snagged this new polish I wanted to use and it happened to be pink!  It's from the recently released Minnie Mouse collection by OPI.  I have to say I was really disappointed in that collection.  First of all because I'm not super into Minnie Mouse.  I never really have been and I'm certainly not going to start now! lol...but also because the entire collection was red's and pink's.  I can appreciate that Minnie is a girl and that she wears red.  But why not mix it up?  They could easily have thrown some darker colors into the mix.  At any rate the only one I had any interest in was Nothin' Mousie' About it which is a clear base with pink shimmer and pink hearts in it.  I paired it with Barry M Strawberry Ice Cream for this simple but fun and VERY girly look. :)  I hope you all enjoy!

Monkey See Monkey Do: Dandelions


It's time for another Monkey See Monkey Do Monday!! Are you all impressed with me that I'm actually doing two in a row?  I am...lol.  It's difficult for me to keep up on these challenges but I really like this one because there are so many wonderful designs I see that I'd love to try but I don't want to infringe on other people's originality either.  So this is a nice balance. :)  Anyway today's art is one I've had on my Pinterest board for like, a million years.  I LOVE the color combination and the softness of this mani.  It looks a lot harder than it really is although mine isn't AS nice as the original.  I'm fairly certain the original artist used a base of China Glaze Sea Spray so I did as well and then I finished off the design with Models Own White and Black art stripers.  I love, love, LOVE the completed look.  If only it didn't have to come off so soon!!  I would really love to give credit to the original poster of this artwork so if anyone knows who did the original or is the original artist please let me know!  I took it off a pinterest board which redirects to this picture on Polyvore:

 
***UPDATE***
Thanks to one of my wonderful readers, I think I've found the origin of this artwork!! It comes from a blog called MaD Mani's! As it turns out, there are tons of other really great mani's on the website so check it out if you get some time!! :)

I hope you all enjoyed today's artwork!!  Thanks for following!

Tokidoki


Well...I finally made it out to Sephora to see what's left of my favorite make-up line, Tokidoki. Remarkably, a lot of what I wanted was still there so I pretty much cleaned up at 40% off!! I also managed to snag four of their polishes, which I'm going to be swatching for you today! The polishes I'm showing you today are: SANDy, Latte, and Donutella.  I also purchased Savana but it's very similar to SANDy though it doesn't have the multi-bar glitter.  So here we go...


Photo taken in natural light;shade.

Photo taken in natural light; full sun.
SANDy is a clear base with gold micro glitter and gold and holo bar glitter.  This is three coats. The coverage is nice but still a bit sparse as you can tell from the second photo which was taken in the sun.  The formula is thin on these and the brush is on the thin side as well. I'd liken it to an Essie or China Glaze brush.  Even though it's a thin formula it's pretty easy to work with and it wasn't difficult to build an even coverage.


Photo taken in natural light; shade.

Photo taken in natural light; full sun.

Latte is a clear base with blue micro glitter and purple and holo bar glitter.  I think this was my favorite of the three color wise.  It also required three coats for full coverage but you can see that it's more compact than SANDy and it really covered well with three coats.  I like that these glitter polishes are buildable so that they can be used over things or on their own.  The formula was the same as the SANDy; a bit thin but very easy to work with.


Photo taken in natural light; shade.

Photo taken in natural light; full sun.

Finally, we have Donutella.  I have no idea how they decided on the character names for these because to me, there is nothing Donutella about this shade (nor was there anything Latte about the previous!!) but it's a gorgeous color none the less.  Same as the preceeding two Donutella is a clear base with a deep magenta micro glitter and holo bar glitter.  It had the most vibrant color of the three and was mostly opaque in three coats.  Formula was the same as the previous two.  I really love the way these all shimmered in the sun. They're just insanely sparkly and reminded me a lot of the China Glaze Prismatics.  


Overall I'm happy with these polishes.  They cost me $6 each which I felt like was a fair price for them.  The coverage is thin but easily builds to opaque in just a few coats which is a plus to me because sometimes I like a full coverage glitter and other times I like a more sparse look over another color.  The bar glitter can sometimes make polishes a nightmare to work with but these went on very easily without any maneuvering required to get the bars on the nail properly.  If they weren't discontinued, I'd definitely buy more!  Plus the bottles are VERY thick and super cute.  They're not cheaply packaged at all.  I did also purchase Savana and it's a clear base with gold and pink micro glitter.  It reminded me a lot of SANDy without the holo bars, but SANDy does not have the pink micro glitter either.  Thanks for looking!! Do you have any Tokidoki polishes?

Red, White and Barry M


These are going up a BIT late but what can I say, I had a busy holiday!!  For those of you who don't live in the US, yesterday was the Fourth of July. The day we all get drunk, cook out, and light off fireworks.  Great combination, no?  It's a celebration of our nations independence and this year, for the first time in eleven years, I was off work.  I had SO much fun celebrating with my family despite the fact that it was close to 100 degrees outside. Redic. I wanted to do some red, white and blue nails for the occasion but then I spotted  some glitters and my original plan went out the window.  Ironically, these are all British polishes by BarryM.  But hey, it looked great anyway!!  I used BarryM Silver Foil as my base and then used a sponge to add Silver, Red and Blue Glitter.  They sparkled SO much.  And my niece loved them so much she asked for me to put them on her nails too!!  Matching BarryManicures. :)


I hope all my US followers had a wonderful holiday!!

Monkey See Monkey Do...


You might remember that awhile back I joined a group called The Purple Crumpet Fairy Challenge.  The group was started by two of my very best polish friends, Debbie and Claire. This was back when the only other challenge I was doing was the Pink Wednesdays (what happened to that?!).  When I joined the group there were four members including myself.  And I'm so proud to say that the group now has just under 200. Since the original days of the PCFC there have been many new features and challenges added.  One of these is called Monkey See Monkey Do.  Now, at the moment I'm working so much that even keeping up with the regular challenges in my life is too much! So I'm definitely not committing to do this every single Monday.  But this past week I was surfing The Crumpet and I found a mani too cute to resist.  I really wish I had taken more time to do this but I had to kind of rush through it and I didn't have a striper so I had to use only a dotting tool.  I think I could have done much better!! But I had so much fun recreating it!  My inspiration comes from A Girl and Her Polish. Here is a picture of her original ladybug manicure:


Super cute, no? 

A Mermaids Tail...


Another of my two finger mani's for work!! This one caught some attention for some reason.  I felt like it was pretty subtle but a number of people asked me if it was those polish strips you buy and stick on your nails.  It lasted all shift but for some reason after I took it off I didn't feel like putting anything else on and then I had some gel polish done so these are the last of the two-fer's for awhile. :)  I have some really cool things coming in the mail that I can't wait to use and share with all of you!!  So I'm going to keep this short and sweet for today. :)  


Colors used:
Zoya Zuza and Maisie, HITS PowerFUL

Popular Posts

Like us on Facebook

Flickr Images