Pumpkin Carving!


Halloween is finally here!! This is one of my favorite holiday's of the year! I love the weather and the parties and dressing up and apple cider and all of it. One of the best things about Halloween is the pumpkin carving! I've done some pretty fun pumpkins in the past and I always try to think outside the box when I do one! So for my nails this year I decided to do some little pumpkin carvings! I used my Born Pretty brush set again for these and I really can't wait to share them with you because I'm already finding so many new things to do with so many options! Anyway I hope you all enjoy your holiday and stay safe and warm!

Here's some of my previous pumpkin art! I usually make my own patterns!


and this years pumpkin....


Have a Happy Halloween!!


Horse Power Nail Compare


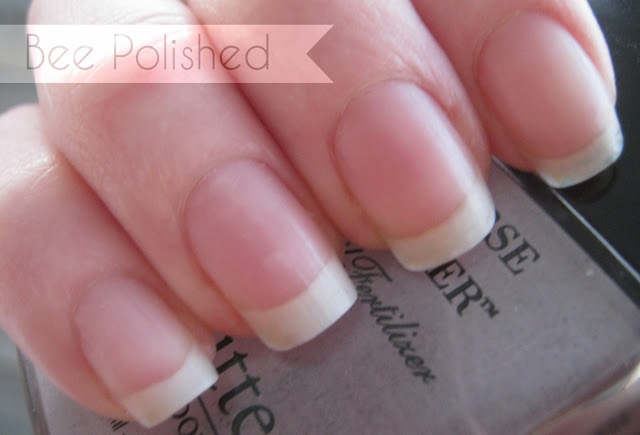
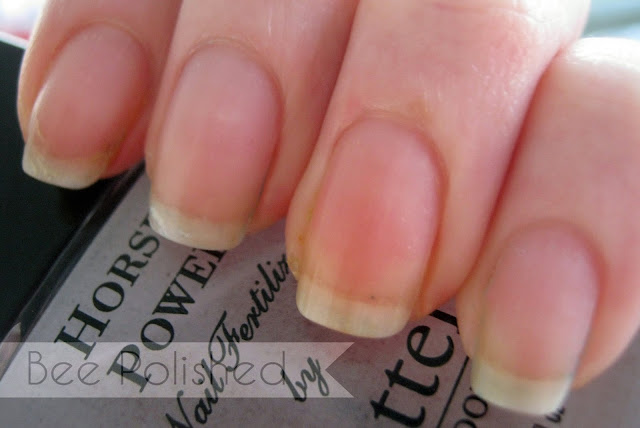
The end has come!! As promised today I'm going to be showing you the difference between using a nail strengthener and simply not polishing your nails. Above you see my final results of four weeks of butter LONDON Horse Power. As I mentioned in my last post I had a bit of peeling but nothing really major and most of it on a previously injured nail. You can see that there's some significant growth and no breaks so that's definitely a plus! On this hand I went polish free with just strengthener for the first week and then after used the strengthener as a base coat under polishes. On my other hand I used NO products. Here are the results of that...

Several things to note here.  One is that the color is very different. Even with a good base coat nails will still show some discoloration from long term polish use. You can certainly buff this off but buffing frequently also weakens nails (especially if done improperly!) so it's always easier to prevent! Obviously no peels here either which is pretty typical for me as my nails normally stay very strong and healthy without any treatments. The length is the last thing to note. I do not have pictures of the original starting point of my left hand so while you can see that there is more growth on this side than the other I know some of you out there will say it's a lie since I have no proof of my start. You can take my word for it or you can choose not to but it's really a smallish amount so it's not super important. Here's what I really want to show you. Look at the shape of my nails on my right hand vs my left. The hand I left product free has much wider nails and they seem more square. This is NOT because of shaping. It's because of this:


The C curve.  See a lot of people, even professionals, want you to believe that polishing your nails does ZERO damage. Well as a professional, a freelancer and a fellow polisher....I want you to know that this is false.  Let's look at this like your hair.  Now some hair products and hair professionals will tell you if you use this product or that or the other, that heat will not damage your hair. But you know this is not true. Heat, dye, even shampoo damages hair. Now if I bleach my hair it's obviously much more damaged than if I simply blow it out. But damage is damage. Acrylics are a little like bleaching and polish is more like flat ironing. But still you can see the damage. I DO moisturize my nails regularly. They get cuticle balm twice a day and lotion at least that and most days more. Previously I've even used a moisturizing base coat but these things will NOT prevent damage. They just minimize it. Some of you may not see right away what I'm talking about so I've drawn some lines to help you on the below pic...


Look at the height of my C curve on the right vs the left. It's nearly double. This is caused by the polish. It creates dryness which causes the nail to curve under more. THAT in turn makes it easier to break the nails. Over dryness can make them more brittle which increases this risk. But in general this is simply changing the shape of my nail. It can be more slight on some people than others but I think that most of us are simply too used to the polished shape to realize that it's not the one we were born with!  Is it serious? No. Will it hurt you? No. But is it better for your nails to grow out polish free? Well...let's just say, it will give you a much stronger base to start polishing!! :)  (as a side note: you can also see in this picture that the Horse Power did not add any thickness to my nail!)

Have you ever tried this experiment? What were your results?

butter LONDON Horse Power Week 4


Well we are at the end of week four on butter LONDON Horse Power and this is how my nails look today. I lost a corner of my index nail but I'm pretty sure it's related to the kitty claw injury I sustained early on. Overall my nails seem pretty much the same as they would if I grew them out without strengthener. I did have some peeling with this one as well. Much less than with the OPI and most of it is limited to my index finger so I can't say for certain it was caused by the butter LONDON because I did have an injury. But I also have a few small ones towards the tip of my middle finger. It did seem to prevent staining fairly well and no scary skin growth like with the Rejuvacote. I also like that it's clear so when you want to reapply over polish it doesn't alter the color. I certainly would recommend it to anyone who wants to try out a strengthener. Overall my preference of the three I've tried was the Rejuvacote but I liked that this applies easily and dries quickly. You also don't need to take weeks off like with the Rejuvacote (although they recommend you do!). I'm going to show you the difference between this hand and the hand I left unpolished next week and I really encourage you to check back with that post because it's important to see what polishing really does to your nails. It DOES damage them (though very minimally) and that's why I always recommend growing them out polish free for a few weeks before you resume your polish routine so you get a nice, strong, fresh base to start with. Have you ever used this product? Did you have good results?

Girly Glitter


Today's small nails look comes to you from Fashion Week again! These nails were sported on the runway shows of Betsey Johnson this year. I really love her but I feel like these were a little tame for her show! At any rate I love how sparkly they are! I think these would be really great in varying colors for the upcoming holiday season. One awesome thing about glitter is it's sort of chip proof! When properly applied it really lasts forever and the even better thing about this is that you can do a really great color underneath and then when it's wearing out a bit just pop the glitter on top and leave it another week! This is the last of the small nails art for the month! There will be a four week update tomorrow and then at the end of the month don't miss the conclusion of my results with butter LONDON Horse Power!! Which look was your favorite?

Guest Post: Kirsten of The Geeky Owl

We're still chugging along with small nails month here at Bee Polished! I promised you guest posts and today I have another one for you! This time it comes from Kirsten of The Geeky Owl! Kirsten always thinks outside the box with her nail art and she loves a lot of the same colors and things as me so that made her a really easy choice for this month's guest post!  Of course, she also rocks the shorter nail look and does it quite fabulously! Don't forget to check out her blog, The Geeky Owl!


I am so excited to be a part of Bee's Small Nails Month! I love that she is doing this feature. Because I sometimes I sit and go through my bloglovin feed and marvel at all the long gorgeous nails that all these bloggers have while looking down at my nubbins. But you know what? I have now come to embrace my nubbins! My small nails can be glorious too!

If you go read through my blog and see the earlier posts, you'll come across longer nails, but they kept breaking or peeling, even with nail treatments. So I tried a shorter/longer version and still they would break. I would also get really bad curving on my index if I let it grow too long. Well, I was sick of fighting it and found if I kept them at a certain length then they were healthy! Less breaks (can't ever say no breaks right?) and no peeling! I find this length to be my optimal nail length.

I love it. Sure, I still look in awe at the long nails that grace other blogs, but you know what? I can scoop out my hair cream and not have it all up under my nail! (one of my pet peeves when my nails get longer!) And even though I have small nails, I can still do nail art! A bonus is that most nail stamping plates fit my nails because they are small! I don't have to worry about the size of the image on the plate! (Now, this is also because I don't have very wide nail beds either). Another bonus? I use less polish? Right? The shorter the nail the less polish! :) Money saved!

In my photo I used Gosh Fairytale as a base and stamped using Konad White and Konad M83.


Another great thing about small nails? They look fab in dark bold colors! Actually, small nails can rock all colors because they are fabulous! :)

Half past moon...


Small nails month continues with this cool look I spotted on a model in a magazine!  It's almost a French but then it's not! It's quite simple to do as well and if you wanted you could do a base color to create a really fun layered look. I like this because sometimes French manicures can make short nails look shorter and this is especially true if you're growing them out as a biter and have very different or uneven free edges. You can just drop the line of your French down to about half way and then the little circle pop at the top keeps them from looking stout or heavy. I used butter LONDON Lady Muck for this but I think it could be really fun to do a full white nail and add two neon pops to the tips for the summer! What do you think of this short nail design? Would you rock it?

Flashback Friday: Pop Art!

dd

It's the final day of the Digital Dozen Skittle Challenge and for today we're going to have a little Flashback Friday! The nails you see above come to you all the way from back in March of 2011 when I had just started blogging and was very new to the world of free hand nail art! In fact, Pop Art! was the fourth post to ever hit my little blog.  I had these weird decals I got somewhere and I wanted to use one and it sort of ended up with this! I used a stamp for the dots and I was so very proud of myself for that free handed word on the bottom! Those were the days before clean-up (and the days when I still REALLY needed it!) and before I bothered really worrying about a uniform shape for my nails. So how did the flash forward come out?


I used primary colors this time since they're more pop art than neons. I still had a decal but it looks kind of spongy now! I don't mind it though cause it reminds me of how my brush art sometimes looks when I don't want to be heavy handed.  I freehanded my dots this go round as well although they're not as uniform as I'd like so I almost wish I'd stuck to stamping! All in all though, I prefer the new look! Which is your favorite?

And don't forget to check out my fellow dozeners art below!!

Three's a crowd...


It's day four of The Digital Dozen's skittle challenge! Today is kind of a throwaway! I had some new stamping polish I picked up super cheap at my local Five Below and I wanted to try it out PLUS I've been itching to try free hand tiger and giraffe so it kind of came together from that! The stamping polish is kind of a fail. It's no darker than my regular black polish and it also smeared a little. Otherwise I'm pretty happy with these nails though! I wish I had used a different color for the leopard because it kind of runs into the design and for some reason the nude background made my light brown color look purple-ish. But you win some you lose some! Don't forget to check out what the other ladies came up with for today!!

Hearts of Blue...

dd

It's day three of the Skittles challenge week with The Digital Dozen!  I really don't know where the inspiration for these nails came from. I saw the color combination somewhere and really liked it and then I just sort of randomly put patterns on the top! I like the idea of skittles but I'm more of a one or two nails kind of girl than a "let's do every nail different" one! It works great when the patterns and colors mesh but it's so hard to know until it's done so I played it safe by just mixing up bases and patterns! I hope you're enjoying the week! I created this look with a brand new brush set I got for review from the Born Pretty website! The full review will be up next month but I can't wait to show you all the awesome brush sizes and shapes! It really has opened up a whole new world of design for me! Please don't forget to check out what the other girls came up with below! And if you're following along on Vine or Twitter be sure to check in today for a preview of some upcoming designs!


The leaves are changing...


It's day two of Skittle Week with The Digital Dozen!  Today I opted to do something a little outside the box. I saw some tree nails on The Nail Network and I decided to sort of recreate them in a seasonal pattern! So from left to right we have Spring, Summer, Fall and Winter!  I used all Zoya* polishes for this which in retrospect might not have been the greatest idea because the red color I chose, Cheryl, was a little less RED than I thought and turned out more brownish on my Fall nail. But I digress, I still like them in the end!  Don't forget to check out the other ladies pages, and if you haven't already, catch some of our art on Instagram and Twitter this week!

*Shimmer Polish in Tracy was also used for the glitter.

The Digit-al Dozen does....SKITTLES


It's Skittle Week over at The Digit-al Dozen!  For day one I decided to do a sort of reverse gradient type of look.  First I polished my nails in gradually darker colors from index to pinky. Then I reversed the order and added the gradient to the tips.  It came out pretty nicely although the middle two nails had a much more subtle change than the outer two and it wasn't incredibly obvious in person! Having as much polish as I do it was a lot harder than I expected to find the right blues to do this with. Some were too green or too purple....but I made it work!

This week is the first Digit-al Dozen challenge since we launched our new media sites so PLEASE check out the website this week for behind the scenes bonus features and so much more! And check out the other ladies art below, as always!

butter LONDON Horse Power: Week Three


 It's the end of another week with the butter LONDON Horse Power treatment and it's time for a check in! Still no major changes this week. My nails are growing quite nicely and I don't notice any peels yet. You might notice on my index finger that my free edge is a bit wonky. In a freak accident of sorts my cat got her claw up UNDER my nail bed and hurt like a bastard is really an understatement. It separated my nail from the bed and left a nasty scratch which is still growing out.  Overall though, the progress seems mostly the same as with the other treatments. No peelies as with the OPI but we've still another week to go yet so you never know!  This week I decided to ditch the round shape. I usually only keep it while my nails are shorter as it helps to keep me from snagging them and also it makes them look a bit longer.
 

They look a bit shorter now but I'm happy to be back to squares! Are you getting excited to see the final weeks results?

Guest Post: Kerrie of Pish Posh and Polish

As you all know, it's small nails month on my blog and I wanted to show you some of my most favorite bloggers who wear their nails shorter for this month! Today I have a guest post from the amazing Kerrie over at Pish Posh and Polish. Please check out her crazy cool blog when you get a moment! Without further a do...


Hi there, I’m Kerrie and I blog over at PishPosh and Polish, I really pleased that I am able to guest post over at Bee Polished, not only is Bee on of my blogging besties but she is also a fellow short-nail blogger!
 
I am really glad Bee is doing this series of post to celebrate shorter nails because from my personal experience, they normal get a lot of hate in the nail blogging community.   So lets get this out of the way shall we? I’m never going to have long nails! In fact these photos show my nails at the longest they have been in a while! Why is that? Well I play Guitar and I cannot fret at all with long nails. About two years ago when I started my blog and nail polish started to become a bigger deal for me I had to make the choice, do I blog and stop playing the guitar or stop my blog before I had even started it? Well I chose a happy medium and two years later I am really pleased with how my little blog has progressed and I have lots of loyal followers who don’t care about my nubbins!


But saying that you will always get hate when you have short nails, and this really upset me. I was really lucky recently to get featured on the Zoya Facebook page and I was so thrilled about it and then I got this comment “errgh, why do people who bite their nails take photos?”, um... hello? When does shorter nails automatically equate to biting them? I mean honestly! I’ve learnt to embrace my shot nails and I’m sure if you are still reading this you do too!
 
The phrase my mother always taught me comes to mind “do unto others as you want done unto you”- basically BE NICE!
 
 
So today’s manicure is my first attempt at a sponge gradient and I really love the result. I have used a base of Fashionista Mystical Dragon which is a brand I think you can only get here in the UK, it is a lovely blue toned teal with lots of yummy glass flecks. I then used a sponge to dab on Revlon Rainforest to my tips which is a darker green which also is jammed packed with glass flecks. The two colours really merge together well and looks lovely and decadent on the nail!
 
I think a gradient really has the effect of elongating shorter nails, it looks really elegant!
 
Anyway I want to say thanks for Bee for letting me post on her blog and feel free to pop over to PishPosh and Polish and say Hi. I would love to hear your opinions on shorter nails and the way blogging can sometimes have a nasty streak! If you have haterz (whether you have short nails or not!) please don’t let it get you down, blog for yourself and as long as you are happy polishing it really doesn’t matter!
 
Kerrie x

Drawkcab Hcnerf....


For today's post I have another recreation of a New York Fashion Week look. This is a simple reverse french. Nude on the top, white at the base. I love this look for a few reasons.  One: It's really edgy and fun.  Two: It's stupid easy. And three: it really works to your advantage if you have smaller nails, ESPECIALLY if they're rounded. Because the focus is at the base of the nail, this draws the eyes away from the short tip. Also, because the rest of the nail is kept nude and the rounded shape and embellished lunula make the nail appear to be more narrow and long.  It's really a win/win!  It reminds me of a look I did last year around the holidays with glitter sponged at the base of a nude nail.


The second look is a bit more subtle and a little more girly but the idea is the same. It really creates the illusion of a longer nail. 

How do you like this look? Do you prefer the half moon or the glitter?

Real nails red carpet


Small nails month continues and today I want to show you all that while in the blogging world talons are considered the norm, in the real world, they aren't necessarily!! Even celebrities with their perfect hair and skin generally have shorter nails!! You've already seen me show off designs sported by Demi Lovato, Busy Phillips and Zooey Dechanel, all sporting shorter nails! Here are some other celebrites who keep them on the shorter side!!


While Ke$ha has been known to sport crazy nail enhancements as well, she generally keeps her nails short...and wild!


Katy Perry always has a different trendy design on her nails! She rarely sports them longer than the tip of her finger.


Zooey Deschanel is one of my favorite style icons! She always rocks cute designs and short, polished nails.

There are PLENTY of other examples of this on the web and as I've already pointed out, most models keep their nails short as well so that they can be easily polished, enhanced, etc.  The nail art I'm rocking today is based on some art another of my favorite short nailed celebs, Demi Lovato, wore awhile back. I jazzed mine up with Zoya Storm, a holographic glittery black.


Who is your favorite celebrity who rocks the short nails?


Butter LONDON Horse Power: Week Two


So it's week two and it's time to check in on how my nails are doing with the butter LONDON Horse Power treatment. Honestly so far they seem to be doing about the same as they would with no treatment. They're not growing any faster than my other hand but they're also not breaking so I suppose maybe it's doing SOME good. Also good is that I've so far had no peeling which seems to be a common problem for me with strengtheners.  I'm going to let them go one more week before I square them off just to make sure I have enough length to soften the corners.  But so far so good! They're looking really healthy!  I've followed the original instructions to wear it for one week, applying daily and then remove and start over and now I'm polishing and using it as a base coat, as well as reapplying daily! I can't wait to see what they'll look like next week! 

Have you used Horse Power? Did you love it or hate it?

Tart With a Twist


We're still chugging along with Small Nails month here at Bee Polished! Today I have another NYFW inspired nail look for you!  This one was inspired by the butter LONDON for Nicole Miller nail art look.  They actually used their new lacquer, The 444 which is a champagne glitter but I like the holographic effect of Tart With a Heart so I went with that. This is another look that is really made for shorter nails because the base is very sheer and on a longer nail the super dark tips might overwhelm the look. I also tend to think that dark french tops on nails with a free edge tends to make it look like you have dirty nails!  Although I'll admit I like the edgy side of it and do rock it here and there. I used The Black Knight to do the tips and these nails sparkled like nothing else! Glitter is also a great way to go when you're growing nails out because it lasts a bit longer than a standard creme polish which makes it ideal for putting on and forgetting about it! Here's the original Fashion Week look:


Do you like this look? Do you think it would be better on shorter or longer nails?

My other half is neon...


Well it's finally here! It's October and this year October is the month of the SMALL NAIL on Bee Polished!! On Saturday, I told you how I had nubbinized my nails for job interviewing. As they're growing back to their medium/short length, I want to show you all how much fun shorter nails can be!  This is a perfect time to do this because NYFW just happened and if you surf for nail art from the event you'll notice that all the models have short, rounded nails. Very classic and very versatile.  This is actually a look from last years fashion week but I love it.  It works really well on shorter nails because the ratio of the neon to white is much better. I love brighter colors anyway on a short nail because I feel like it's not as flashy as on longer nails! Plus this look is wickedly easy to achieve and because the color is concentrated at the ends, it can actually draw the attention up and make shorter nails less stubby looking, especially if you have wider nail beds!  I hope you all have fun exploring the world of short nails with me this month! Do any of you keep your nails shorter? Would you try this look?

Popular Posts

Like us on Facebook

Flickr Images