Rehab your nails: On the go cuticle care!


Well, fall is nearly upon us and that means winter is not far behind.  If you're anything like me (or you live anywhere that gets as cold as it does where I am!) then you know how terrible winter can be on your nails.  There are lots of ways to combat this, one of my favorites being paraffin dips, but aside from that one thing that can really help is keeping hands out of water.  Frequently wetting nails can actually weaken them so in the winter, waterless mani's are a great alternative to the traditional ones. Keeping your cuticles under control is especially important in the colder months when they can easily dry out and crack.  So today I'm going to tell you how you can do a quick 10 minute manicure with ZERO water!  This is so easy that those of you who work in offices can get away with doing it at your desk with minimal interruption to your workday!  I'm using mostly OPI products for this but generally speaking all you need is some lotion, a GEL cuticle remover, and a cuticle pusher.  I've added a file to the picture above and if your nails need reshaping it's a great time to throw that in but if you just need a quick cuticle pick me up you can skip that step.  So here's the how to:

Put the gel cuticle remover on cuticles and let it sit for three to five minutes.  The gel is important because this is a mani you can do on the go and having a liquid can be messy.  If you're sitting down to do this you're welcome to use a liquid BUT keep in mind that liquids don't stay on the nails as long either whereas gels are going to sit on the cuticle and penetrate them.  Since we're not using water to aid in softening them it's going to help a lot to have the gel. 

After it's set for a bit use your pusher to gently push back the cuticle.  If you're keeping up with regular mani's and cuticle care you should not have anything to nip off so this should be super simple and effective. I always keep nippers on me and if your cuticles are pretty bad you'll want to add them to this routine.  However, as you do it more you'll find you don't need them.

Step three is to add the lotion. Again if nails are very bad and you're doing this at home you can add some oil and let it penetrate three or four minutes and THEN add the lotion.  But if you're on the go just add the lotion and you're done!  Easy ten minute manicure that will keep your cuticles under control this winter!

What are your favorite products for winter?

Rehab Your Nails: How to fake a long nail bed


OK...the time has come. Today I'm going to show you how you can quickly fake the look of a longer nail bed.  This only really works with specific manicures and the best example is a french.  What you're looking at now is my bare nails.  Notice that the free edges are not all the same length.  This happens when the beds on some nails are longer than others and it's pretty common.  When my nails are polished, you don't notice the difference and they all appear uniform.  There are ways to change that too, at least to some extent but it's also why some people choose to file their nails with polish on.  I don't recommend that but filing is not the topic of the day so let's focus instead on how we can polish these in a way that makes them all uniform and also long and slim.  In this next picture, I have polished my nails with a series of different French tones. 


From left to right I have used: Sheer Nude, Bare Rose, Beverly Hills Plum and then a clear coat for the base polish. These are all by Orly (except the clear which is just Seche Vite).  I used Zoya Purity to do the tips.  There is nothing special going on here. I just did a standard French following my natural free edge.  To make them appear a bit more uniform, I've drawn the white line down a bit on some nails. If you have longer nail beds that's not going to be an issue for you but to create a larger free edge is suicide for shorter nails. You're only increasing the shortness of the bed.  So what can you do?  Here's a trick that pro's use...


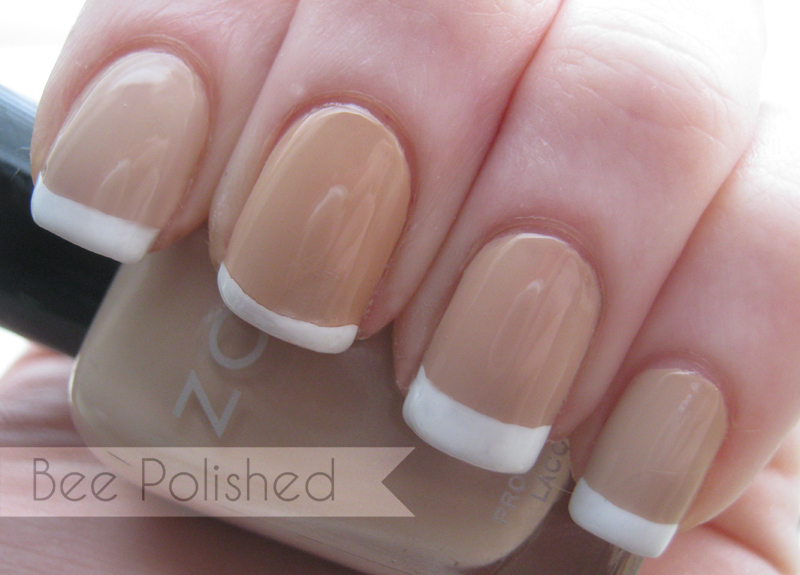
Start by polishing your nails with an opaque but flesh toned polish.  I've used Zoya Avery here and it looks much closer to my skin tone in real life than in this picture. You may have to do some digging around to find a good tone to match your skin. I really recommend checking out the Zoya nude tones first because they have several really great ones that should fit anyone. (I picked up Kennedy first but she was too pink for me).  Once you have your base down, polish a regular French manicure on.  Just for thoroughness I have used the same combination of French tones OVER the nude color for this manicure. Again from left to right we have: Sheer Nude, Bare Rose, Beverly Hills Plum and then a clear coat.  You can see that it affects the color of the base just as it did my natural nail bed.  Now I want you to notice what I've done with the white line.  On my index and pinky nail, the bed is exactly the length it was above. I haven't extended the bed or the free edge, I simply polished along my natural line.  Now look at my ring finger.  Here I've extended the free edge (the white line) to make my nail appear longer but my bed appear shorter. This trick works well for longer beds because it can make your nails appear longer without stunting a short bed. You can see that because my beds are longer, it didn't make them particularly wide or short looking, rather it just gives the appearance of a longer free edge.  Now look at my middle finger. Here I've shortened the free edge dramatically. now my nail looks shorter, however, my nail bed looks longer. See how easy it is? Those with shorter nail beds can use this trick to lengthen them while those with longer nail beds can use it to lengthen the free edge in just a few minutes!  Try this trick with your own nails and experiment with different sizes of white and nude to see what works best for you! :)

*Note: this trick is intended to give the appearance of a slightly longer nail bed or free edge. It does not change the actual length of your nails and should not be used to drastically increase these proportions.

These are my nails...


These are MY nails on Nail Envy.  Ok so I will start by saying that I have never been a big supporter of nail strengthening products.  There are two main reasons for this.  One: I have never had any real need of them.  My nails have always been strong and grow quickly without peeling unless I'm being really crazy with them (like the week I had three sets of student acrylics and a set of wraps put on and taken off them!!).  I would love to attribute this to my healthy, vegetarian lifestyle but...I probably just need to thank my wonderful parents for the good genes.  Two: they don't really work.  Now, I know some of you are thinking, but they make MY nails stronger.  Well...let me rephrase that for you.  They do work.  In a sense.  Do they add strength to your nails? Yes.  Do they prevent peels? They can.  But are they really STRENGTHENING your nails? No.  Nail strengtheners are a lot like split end "repair" creams in that they DO fix the problem but they don't really FIX the problem.  They work at the surface of your nail which is why if you want to keep seeing results, you need to keep applying them into forever.  I actually have a post planned which will discuss different strengtheners and why to use them or not to and how they work. That's not for today! Today I want to show you why I personally choose to abstain.  I got this bottle of Nail Envy by OPI for free and I have used it here and there when my nails have been wrecked. More so because I find that it feels soothing than anything else. But since I had two nubbin hands I decided, I may as well test out this theory!  I totally flaked on a pic of my nails before I started this routine but both were the same length and they were essentially just below the tips of my fingers.  I did exactly what the Nail Envy bottle said to do and applied two coats the first day and one every other for two weeks.  I didn't use any polish during that time on EITHER hand but left my other one completely free of polish or treatments.  I didn't see much change so I gave myself a mani at the end of the first two weeks and then started over.  This is four weeks of nail growth.  My middle finger broke early on so it's a bit shorter than the others but aside from that I had no serious problems. Now, you might be saying to yourself, those look pretty good, right? Well ladies and gentlemen...let me show you my OTHER hand:


This is pre-manicure so excuse my raging cuticles!  I did have one tragedy on this side as well and you can see it on the pinky. Looks like someone got hungry and took a bite! However, overall the growth is definitely better on this side than the other. Aside from the difference in growth I had another issue with the nail envy side...


Check out the tip there....hello peelies!  Yikes.  I don't think I'll use the Nail Envy again unless it's dire straights. One thing I would like to point out though is that using a nail strengthener on strong nails CAN make them brittle.  That wasn't the issue here but in the interest of full disclosure now you know.  I asked some of you on my Facebook how you felt about Nail Envy and there were mixed reviews.  Some of you mentioned Seche Rebuild, Nail Magic, Nail Tek and Rejuvacote.  I'll definitely be including some of those in my upcoming nail strengthener post!! 

Have any of you had better results with Nail Envy?

Did you know...


...there are five basic nail shapes?  
There are lot's of fun, new trends like stiletto nails, lipstick nails, and duck nails but all or most of these fall into the basic five shapes: round, square, oval, pointed, and squoval.  So with all these choices, how do you know which shape is right for you?  Simply use your cuticle as a guide.  Are your cuticles more of an oval shape?  Then an oval shaped nail will be the best fit for you.  Are they wider and less rounded at the edges? Go with a square shape or a squoval.  Balancing the nail with the cuticle will not only be the most aesthetically pleasing choice for your nails, but it will also allow you to get the most strength and longevity out of them!


Pro tip:  When drastically changing the shape of your nails, go slowly!  Transition from square to round by going first with a squoval shape.  Going from round to square? Simply nip the round tip and file. 

Popular Posts

Like us on Facebook

Flickr Images